How to Draw Mountains: A Simple Layered Landscape
Draw a mountain range in five steps: an uneven zigzag of peaks, ridge lines, hatched shadow sides, a jagged snow line, then a paler range behind and tiny pines in front for depth.
This drawing at a glance
What you need
- HB pencil
- 2B pencil
- Soft eraser
- Plain paper
A mountain range is one of the kindest subjects for a first landscape. There are no straight edges to get wrong, no exact proportions to match, and a wobbly line usually improves the result. If you have been wondering how to draw mountains that look solid and far away instead of like a row of flat triangles, the answer comes down to two ideas: a light side and a shadow side, and layers that get paler with distance.
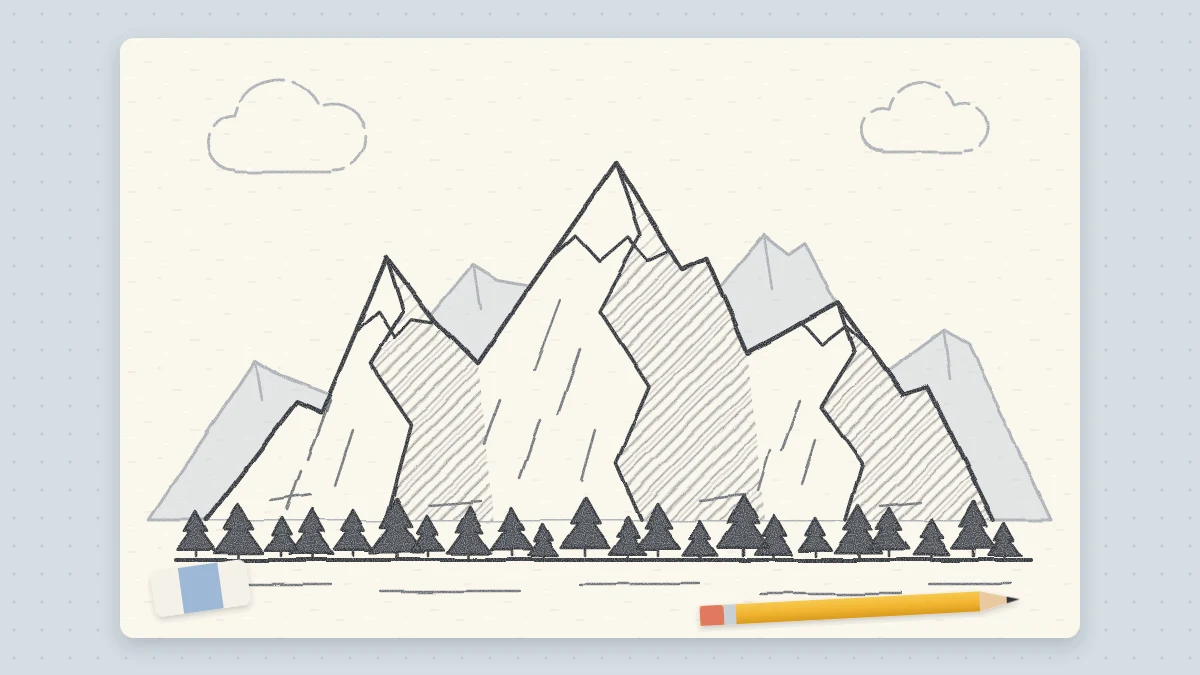
The five steps below build a small scene of three peaks with snow, a fainter range behind them and a line of tiny pines in front. It takes one sheet of paper and two pencils.
What you need
Use an HB pencil for the light first lines and the distant range, and a 2B for the hatching and the nearest details. Add a soft eraser and plain paper. Turn the page sideways so the scene is wider than it is tall, and plan a drawing about 7 in (18 cm) across.
Plan the light before you start
Decide where the sun is and keep it there for the whole drawing. In this tutorial the light comes from the left, so the left face of every peak stays pale and the right face is shaded. That single decision is what turns a zigzag into a set of solid forms.
How to draw a mountain range in five steps
Keep the first lines light so they erase cleanly. Draw from the elbow and let the line shake a little; rock is not smooth.
- Draw an uneven zigzag of three peaks. Start at the left edge, about a third of the way up the page. Take the line up to a first peak, down into a dip, up to a taller second peak near the middle, down again, and up to a lower third peak before it falls off the right edge. Make every peak a different height and every slope a different length. Proportion check: the tallest peak should be about one and a half times the height of the lowest, and no two dips should sit at the same level.
- Drop a ridge line from each peak. From the tip of each peak, draw a wavering line down toward the base, leaning slightly to the right and stopping where it meets the next slope or the bottom of the range. Do not make it straight; give it two or three small kinks. This line splits each mountain into a light left face and a shadow right face.
- Hatch the shadow sides. With the 2B, fill the area to the right of each ridge line with parallel diagonal strokes that run in the same direction as the slope. Keep the strokes close together near the ridge and let them open up lower down. Leave the left faces almost untouched.
- Add a jagged snow line. About a quarter of the way down from each tip, draw a ragged zigzag across the mountain, like the edge of torn paper, with a few long points running down the gullies. Erase any hatching above it on the shadow side and replace it with a few very light strokes, so the snow stays brighter than the rock below.
- Add a far range and a row of pines. Switch back to the HB. Behind the main peaks, draw a second, lower ridge whose tips show in the gaps, using a pale line and one flat light tone with no ridge lines or snow. Then, along the bottom, draw a row of tiny pines: a short vertical stroke for each trunk with a small zigzag getting wider toward the base. Vary their heights and let them overlap the foot of the mountains.

Shading the slopes
Darken the shadow face right beside the ridge line and next to the snow, where the contrast is strongest, and let it lighten toward the foot. The light faces need only a few short broken strokes near the bottom. If hatching is new to you, the guide to hatching, blending and value explains how to keep strokes even and build tone in layers.
Depth from overlap and value
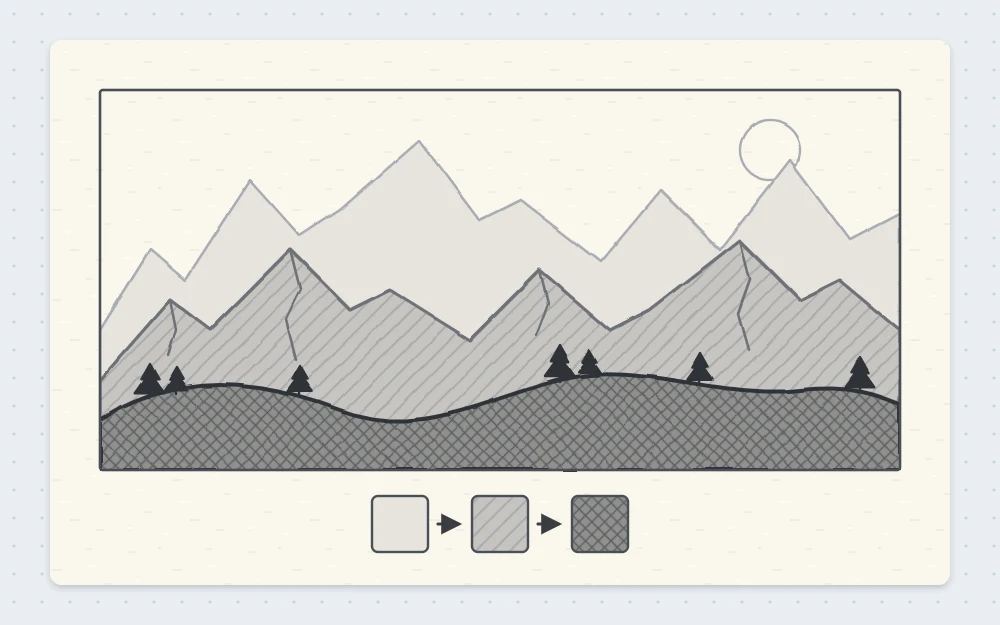
Distance does two things to a landscape. It makes things smaller, and it makes them paler and less detailed, because there is more air between you and them. You can use this deliberately by giving each layer its own value.
- Nearest layer: the darkest tone, the sharpest edges and the most detail, such as the pines.
- Middle layer: a medium tone with clear light and shadow, such as the main peaks.
- Farthest layer: the palest tone, a soft edge and no detail at all.
Common mistake
Outlining every layer with the same dark line. Keep the heaviest line weight for the foreground and let the far ridge be a faint edge of tone.
Finishing the foreground and sky
Because everyone knows roughly how big a tree is, a row of very small pines tells the eye that the mountains behind are huge. Keep them no taller than a fingernail, in uneven clumps. For a larger, more detailed tree closer to the viewer, the tree tutorial covers trunks, branches and pines built from zigzag tiers.
A lake edge also works: one level line across the base of the mountains with a few short horizontal strokes below it for ripples.
Leave the sky mostly empty. One or two soft shapes are plenty, and the guide on drawing soft, fluffy clouds shows how to keep them light.
Variations to try next
- Rolling hills. Replace the zigzag with long, low curves and use smooth tone instead of hatching.
- More layers. Add a fourth and fifth range, each one paler than the last.
Troubleshooting
- The peaks look like a saw blade. They are too similar. Change the heights, widen one mountain and narrow another.
- The mountains look flat. The ridge lines are missing or run straight down the middle. Redraw them off center with a few kinks.
- The snow looks like a cap sitting on top. The snow line is too level. Make it ragged and pull long points down the slopes.
- The far range merges with the main peaks. Lighten it with the eraser until there are three clear steps of value.
A first landscape is rarely tidy, and it does not need to be. Draw the scene again with different peak heights; practice helps the layers separate.
Frequently asked questions
How do you make mountains look three-dimensional?
Give every peak a light side and a shadow side. Draw an uneven line from each tip down toward the base, keep one face pale and hatch the other, always on the same side across the whole range. Consistent light is what makes the peaks look solid.
How do you show distance in a mountain drawing?
Overlap the layers and change their value. The nearest layer gets the darkest tone and the most detail, the middle layer a medium tone, and the farthest range a pale flat tone with a soft edge and no detail. Small trees in front also suggest scale.
What is the easiest way to draw snow on a mountain?
Draw a ragged zigzag line across each peak about a quarter of the way down, with a few long points running down the slopes. Leave the area above it nearly white on the light side and only lightly toned on the shadow side.