How to Draw a Cactus in a Pot: An Easy Houseplant Sketch
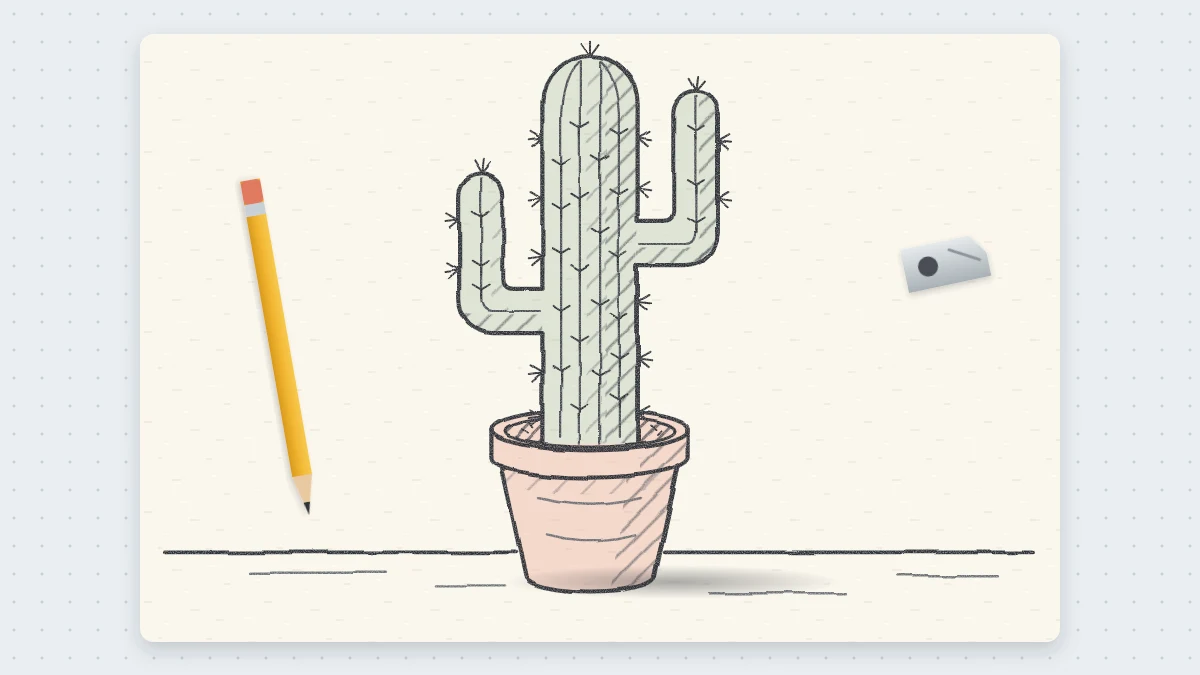
Sketch a potted cactus in five steps: a tapered pot with a rim, a tall rounded column, two upturned arms, curved rib lines and small clusters of spines. Plus a barrel cactus and a succulent rosette to try.
This drawing at a glance
What you need
- HB pencil
- 2B pencil
- Soft eraser
- Plain paper
A potted cactus is about as forgiving as a plant subject gets. Its shapes are simple rounded tubes, nothing has to be symmetrical, and a bump or a lean only makes it look more like the real thing.
This tutorial shows how to draw a cactus with two upturned arms growing in a clay pot, in five steps.
What you need
An HB pencil for the light construction lines, a 2B for the final outline, spines and shading, a soft eraser and plain paper. Plan a drawing about 6 in (15 cm) tall, with the pot taking up roughly the bottom third.
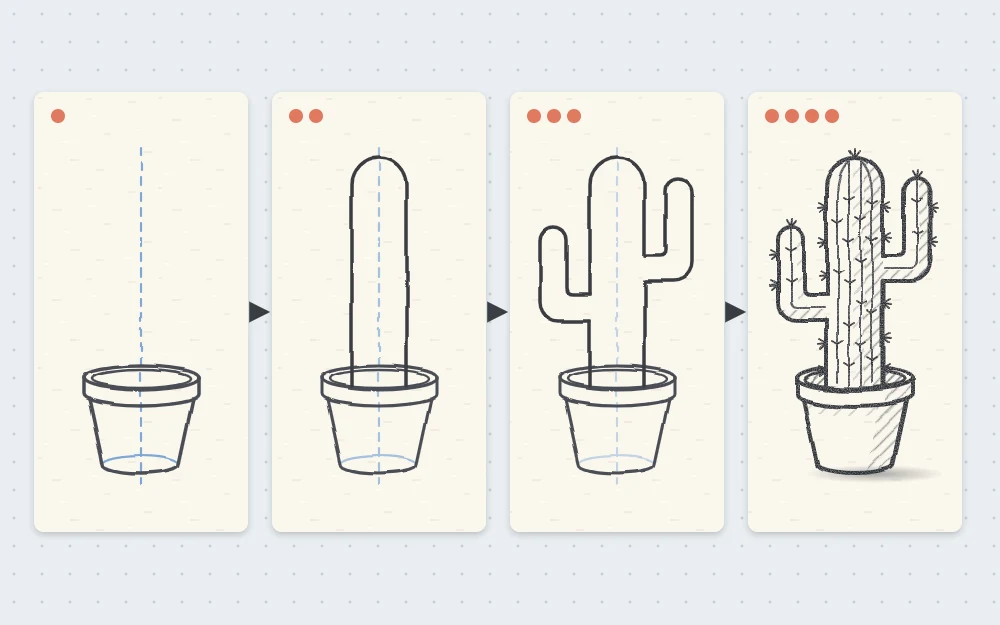
How to draw a cactus in a pot in five steps
Keep everything light until step four. The plan here has the light coming from the left, so the shading goes on the right.
- Draw the tapered pot with a rim. Draw a flat ellipse about 2 in (5 cm) wide for the top of the pot. Just below it, draw a matching curve for the bottom edge of the rim and join the two with short vertical lines, so the rim is a shallow band. From the rim, bring two straight sides down and slightly inward, then join them with a curve that bows downward like the front of the ellipse above. The base should be about two thirds as wide as the rim.
- Add a tall rounded column. From inside the top ellipse, draw two nearly parallel lines rising upward and close them with a dome, like a thumb. Make the column about half as wide as the pot rim. Proportion check: the column is about twice as tall as the pot.
- Add two arms at different heights. About a third of the way up the left side, draw an arm that leaves the column sideways for a short distance, then bends in a smooth elbow and points straight up, ending in a rounded tip. Put the second arm on the right side, higher, about halfway up, and make it shorter. Each arm is about two thirds as thick as the column, and neither should reach the top of it.
- Draw the rib lines. On the column, draw four or five lines running from the base to the top. The middle one is nearly straight; the ones on either side bow outward, following the edge of the form, and they all converge at the center of the dome. Do the same on each arm with three lines that follow the bend of the elbow.
- Add spines, soil and shading. Along each rib line, at regular intervals, draw clusters of three short strokes fanning out from one point. Fill the top ellipse of the pot with a bumpy soil line and a few dots. Darken the outline with the 2B, then shade the right side of the column, of each arm and of the pot.
Getting the pot right
The pot is a cone with its point cut off, turned upside down. Three things keep it convincing.
- The ends of the ellipse are rounded, never pointed.
- The curve of the base matches the front curve of the rim. A flat line across the bottom makes the pot look cut out of card.
- Both sides lean inward by the same amount. Draw a faint vertical center line first if the pot keeps tipping.
If ellipses and cones are still unfamiliar, the guide on drawing 3D shapes explains both forms step by step.
How rib lines make the form look round
Straight, evenly spaced vertical lines would make the column look like a flat striped board. Lines that curve with the surface describe a cylinder.
Two details help. The curves get stronger toward the sides, with the outermost lines nearly echoing the outline. And the gaps between the lines get narrower toward the edges, because that part of the surface is turning away from you.
On the arms, let the rib lines turn the corner with the elbow. That is what makes the bend read as a tube and not a flat L shape.
Common mistake
Covering the whole cactus in single spines like fur. Small clusters placed only along the rib lines look tidier and more like a real plant.
Shading and spines
With the light on the left, lay a band of tone down the right side of the column and each arm, darkest a little in from the edge and fading toward the middle. Add a small dark patch under each arm where it shades the column, and a narrow shadow under the rim of the pot. A short cast shadow on the table to the right of the pot stops the drawing from floating.
For the spines, use quick flicks with a sharp 2B so each stroke tapers, and let a few clusters poke past the outline.
Two quick variations
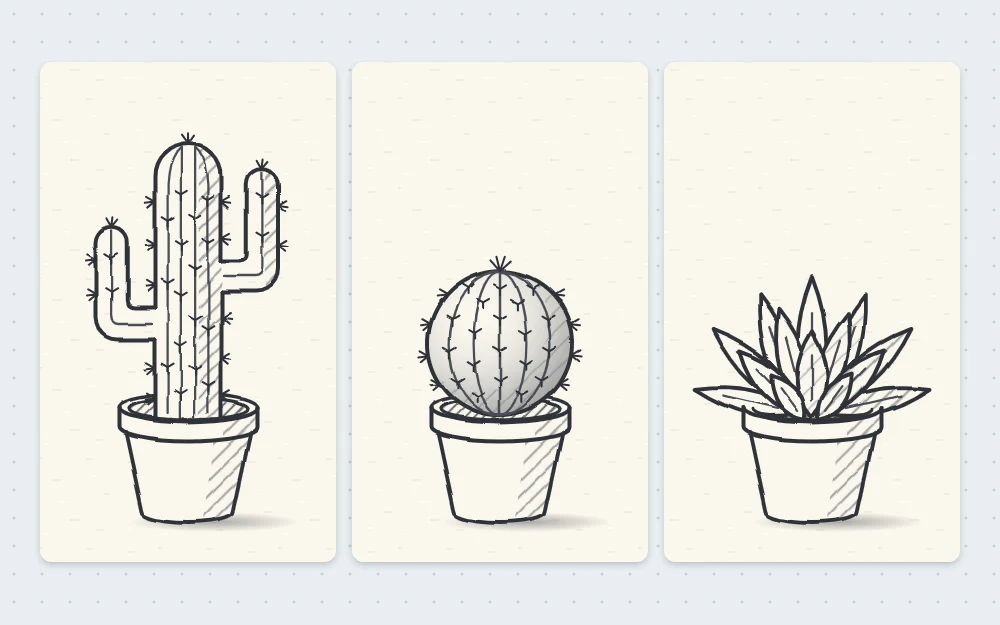
Round barrel cactus
Draw the same pot, then sit a slightly squashed circle in it, a little wider than the rim. Mark a point at the center of the top. Draw rib lines from that point down to the soil, straight in the middle and bowing strongly outward at the sides, like the segments of a peeled orange. Add spine clusters along each rib.
Succulent rosette
Start with a small pointed oval in the center, standing upright. Surround it with a ring of four or five slightly larger pointed leaves, each tucked behind its neighbors, then a second ring of larger leaves that lean outward and show in the gaps of the first. Keep the leaves thick and plump with rounded sides. For practice with single leaf shapes and veins, see the guide on drawing leaves.
Troubleshooting
- The cactus looks flat. The rib lines are straight. Redraw them bowing outward and add shading on one side.
- The plant looks like a figure waving. The arms are at the same height and length. Lower one and shorten the other.
What to try next
Group three pots of different heights on one table line and overlap them slightly. Or simplify everything, round the shapes and add two dot eyes and a small smile to the pot, an approach covered in the collection of cute drawing ideas.
A first cactus may lean or bulge in places, and that rarely hurts it.
Frequently asked questions
How do you make a cactus drawing look round?
Use rib lines that curve with the surface. Keep the middle line nearly straight, bow the outer ones toward the edges, and narrow the gaps between them at the sides. Then add a band of shading down one side of the column and each arm.
How do you draw cactus spines without making it messy?
Place the spines in small clusters of three short strokes fanning out from one point, spaced evenly along the rib lines only. Flick each stroke so it tapers, and let a few clusters stick out past the outline, where they are easiest to see.
What shape is a plant pot when you draw it?
A typical clay pot is an upside-down cone with the point cut off. Draw an ellipse for the opening, a shallow band below it for the rim, two sides that lean inward, and a curved base that matches the front curve of the opening.