How to Draw Clouds That Look Soft and Fluffy
Build a fluffy cloud from five overlapping circles, break the outline so it stays soft, and shade the underside while the top stays white. Includes two other simple cloud types and tips for filling a sky.
This drawing at a glance
What you need
- HB pencil
- 2B pencil
- Soft eraser
- Kneaded eraser (optional)
- Plain paper
Most first clouds come out as a row of even bumps with a heavy line around them, a bit like a speech bubble floating in the sky. Real clouds have no outline at all. They are soft heaps of light and shadow, bright on top and gray underneath, and that is the look worth aiming for.
Learning how to draw clouds is mostly a matter of doing less: lighter lines, fewer bumps, and tone instead of edges. The four steps below build one fluffy heaped cloud, the kind you see on a fair summer afternoon, and the same method then stretches to a whole sky.
What you need
An HB pencil for the light construction lines, a 2B for the shading, a soft eraser and plain paper are enough. A kneaded eraser is a useful extra here, because you can pinch it to a point and lift small patches of tone back to white, but it is optional.
Why cloud outlines should stay soft
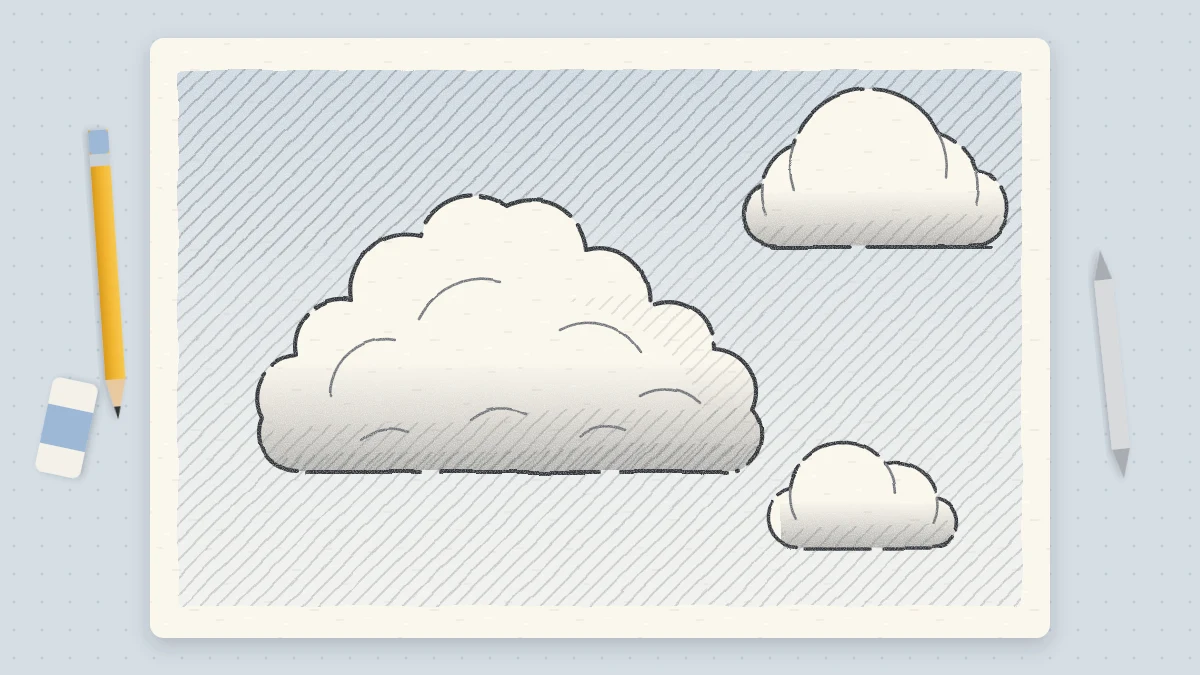
A hard, even outline tells the eye that an object has a firm edge, like a stone or a plate. A cloud is closer to a pile of cotton: the edge is crisp in a few places and fades away in others. You get that effect with a broken line, one that changes line weight along its length and disappears completely here and there.
Press a little harder in the dips between bumps and lift the pencil almost off the paper along the sunlit top. Your eye joins the gaps.
How to draw a fluffy cloud in four steps
Work about 5 in (13 cm) wide so your hand has room to move. Assume the light comes from above, which is true of nearly every daytime sky.
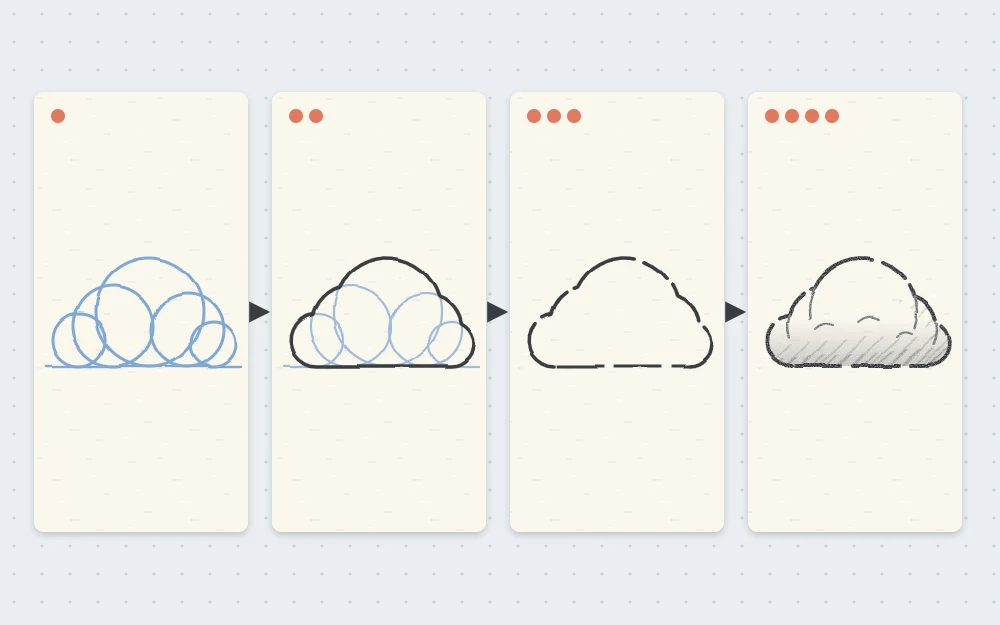
- Draw a flat base line and five circles. With the HB pencil, draw a faint horizontal line about 5 in long. Sit five overlapping circles on it, each a different size. Put the largest slightly off center, a medium circle on each side of it, and a small one at each end. Let every circle overlap its neighbor by about a quarter of its width. Proportion check: the whole heap should be about twice as wide as it is tall.
- Draw a bumpy outline around the outside. Follow only the outer arcs of the circles, from one end of the base line up over the top and down to the other end. Where two circles meet, let the line dip into a small notch. Add one or two smaller bumps of your own so the top is not too regular.
- Erase the inner lines and break the outline. Rub out the parts of the circles that fall inside the cloud. Then dab the eraser along the top edge in three or four places so the outline has gaps. Erase most of the base line too, leaving only a few short flat dashes.
- Shade the underside and leave the top white. Switch to the 2B and lay soft tone along the bottom third of the cloud, darkest just above the base. Add a small crescent of light tone under each bump where it tucks behind the one in front. Leave the upper surfaces as clean paper.
Tip
Vary the circles more than feels natural. One large, two medium and two small gives a lopsided heap, and lopsided is what makes a cloud look real.
Shading the underside
The shading does the real work, so build it slowly. Hold the pencil farther back, tilt it so the side of the lead touches the paper, and make small overlapping strokes with light pressure. Two or three pale layers look smoother than one dark one.
Keep the darkest value near the flat base and let it fade as it climbs, so there is no line where the shadow ends. If you would like more control over smooth tone and soft edges, the guide to simple shading techniques covers layering and blending in detail.
Shade the sky to make the cloud glow
White paper only looks bright next to something darker. Lay a light, even tone over the sky around the top of the cloud, working right up to the edge and stopping there. The sunlit top now stands out as the lightest thing on the page, and you can erase what is left of the outline along it.
Common mistake
Rubbing the whole cloud with a fingertip to soften it. This spreads gray over the white top and flattens the form. Soften only the shadow, and keep the top clean.
Two other cloud types to try
Once the heaped cloud feels comfortable, two simpler types fill out a sky.
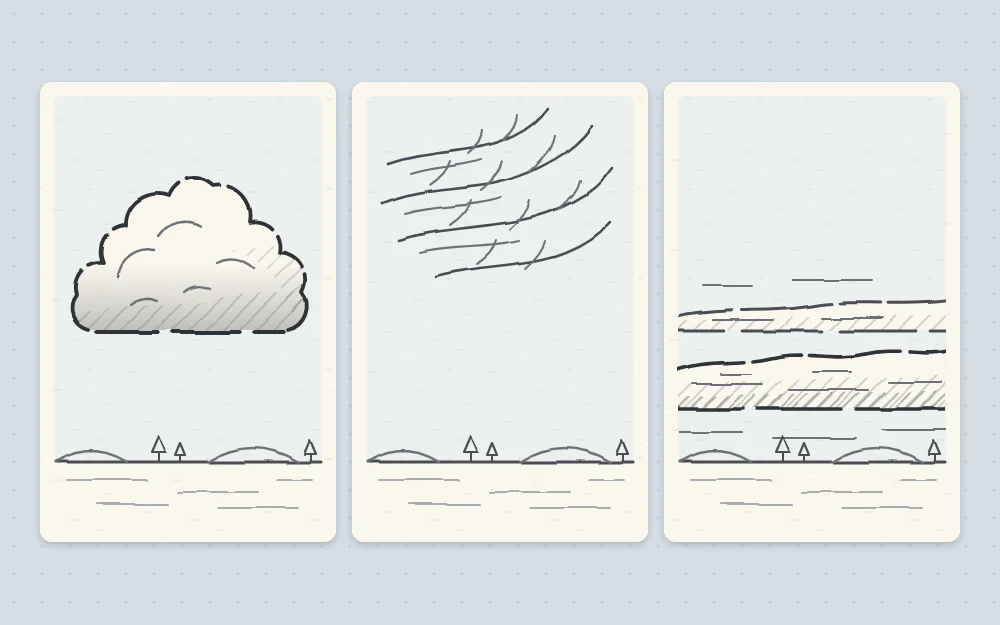
- Thin streaks. High, wispy clouds are a few long, slightly curved strokes that taper at both ends, like brush marks. Draw them with the side of the pencil in one quick movement, all leaning the same way. They need no outline and no shadow.
- A low flat layer. A long, level band with a nearly straight base and a gently lumpy top. Shade the whole band in a pale gray, a little darker underneath, and keep both ends ragged.
Placing clouds in a sky
Clouds follow the same rule as everything else in a landscape: things farther away look smaller. Draw the largest, most detailed clouds near the top of the page, since those are the ones almost overhead. Make them smaller, flatter and closer together as they approach the horizon, and give the far ones very little shading.
Use an odd number, three or five, in mixed sizes, and let one overlap another. A sky like this sits well behind a layered range when you draw a simple mountain landscape, and a single small cloud above a low horizon finishes the scene in the sailboat tutorial.
Troubleshooting
- The cloud looks like a sheep or a bush. The bumps are too even. Redraw with fewer, larger bumps and one that clearly dominates.
- It looks flat. The shading is the same value everywhere. Darken the base and clean the top with the eraser.
- The edge looks cut out. The outline is still continuous. Erase gaps along the top and let the sky tone define that edge instead.
First attempts are usually a little stiff. Fill a page with five or six small clouds, changing the circles each time, and the shapes loosen up with practice.
Frequently asked questions
How do you make a cloud look fluffy in pencil?
Avoid a solid outline. Use a light, broken line that fades out along the top, keep the upper surfaces as clean paper, and put soft gray tone only on the underside and in the dips between bumps. A lightly shaded sky around the cloud makes the white top look brighter.
Which pencil is best for shading clouds?
A 2B works well for most cloud shading because it gives a soft gray without much pressure. Use the side of a slightly blunt tip and build the tone in two or three light layers. Keep an HB for the faint construction lines, since it erases cleanly.
Why do my clouds look like cartoon outlines?
Usually the bumps are all the same size and the line around them is dark and unbroken. Start from circles of clearly different sizes, erase gaps in the outline along the sunlit top, flatten the base, and let shading show the form.