How to Draw Leaves: Five Simple Shapes With Veins
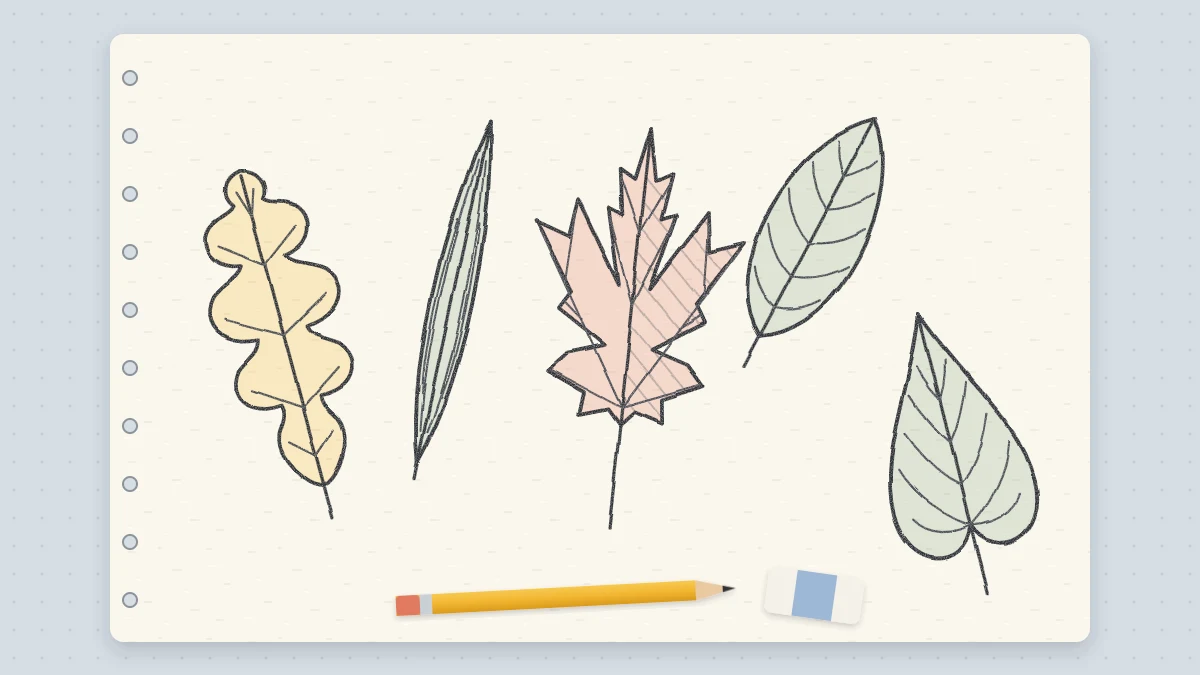
Start every leaf with a curved center line, then build five shapes around it: oval, heart, narrow blade, lobed and five-pointed. Add curving veins, an uneven edge and a turned tip, and arrange leaves into a sprig.
This drawing at a glance
What you need
- HB pencil
- 2B pencil
- Soft eraser
- Plain paper
- A few real leaves to look at
Leaves turn up everywhere in a sketchbook, and they are forgiving. No two real leaves match, so a slightly lopsided one simply looks natural.
The trick to learning how to draw leaves is to stop starting with the outline. Every leaf, whatever its shape, grows from a central vein called the midrib. Draw that line first and the outline, the veins and the curve of the whole leaf fall into place around it. One simple leaf comes first, then four more shapes.
What you need
An HB pencil for the light guidelines, a 2B for the final outline and shading, a soft eraser and plain paper. If you can, put two or three real leaves on the table to look at.
Start with the center line
The curve of the midrib decides the leaf’s whole gesture. A straight center line gives a stiff, flat leaf. A gentle C curve gives one that bends, and a shallow S curve gives one that twists.
Draw this line in one smooth movement from the elbow, not in short strokes from the fingers. If your curves come out shaky, a few minutes of line control drills before you begin makes a noticeable difference.
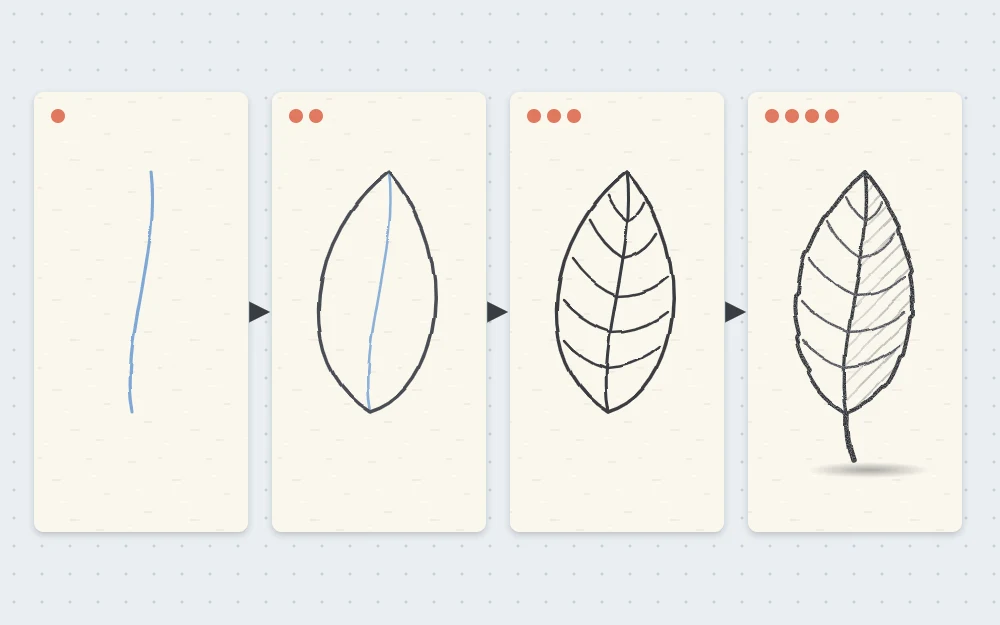
How to draw a simple leaf in four steps
Draw the leaf about 4 in (10 cm) long so there is room for the veins.
- Draw a gently curved center line. With the HB pencil, draw a light line about 4 in long that leans to one side and curves slightly, like a shallow C. The lower end is the base of the leaf and the upper end is the tip.
- Draw a pointed oval around it. Starting at the base, draw one curve that swells outward and comes back to meet the center line at the tip. Repeat on the other side. Both ends should be pointed. Proportion check: the widest part of the leaf is about half its length, and it sits slightly below the middle, closer to the base.
- Add the side veins. Draw five or six veins on each side. Each one leaves the center line at an angle of roughly 45 degrees, then curves toward the tip as it nears the edge. Stop each vein just short of the outline. Stagger the two sides a little so the veins do not meet in perfect pairs, and space them closer together toward the tip.
- Finish the edge, stem and shading. Go over the outline with the 2B and let it wobble slightly, with one or two small dents, so the edge is not perfectly smooth. Extend the center line below the base as a short stem made of two close lines. Then lay light shading over one half of the leaf and leave the other half pale.
Tip
Draw the veins lighter and thinner than the outline, or the leaf looks barred.
Four more leaf shapes
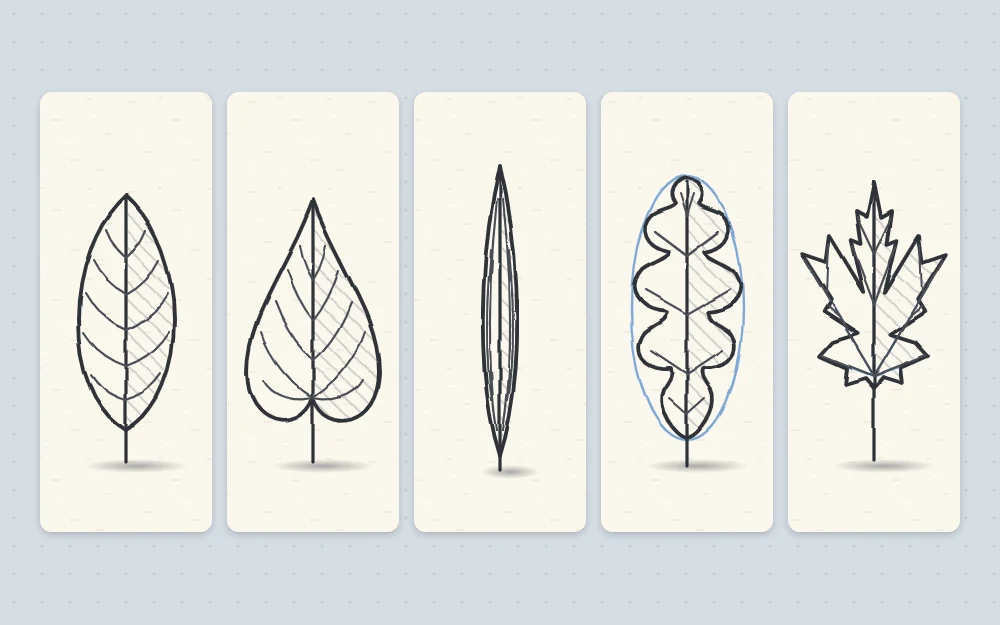
Each of these begins with the same curved center line. Only the outline around it changes.
Heart-shaped leaf
Draw the center line, then start each side with a rounded bulge that rises slightly above the base before sweeping down to a sharp tip. The two bulges leave a small notch where the stem joins. Make the leaf nearly as wide as it is long.
Long narrow blade
Draw a long center line with a strong curve. Add two sides that stay close to it, so the leaf is about six times as long as it is wide, and taper both ends to a point. The side veins are short and run almost parallel to the midrib, so a few fine lines are enough.
Lobed oak-style leaf
Around the center line, lightly sketch a long oval guide that is widest above the middle. Then draw the real edge as a wavy line that swings in and out of that guide: three or four rounded lobes on each side with a deep rounded dip between each pair, and one lobe at the tip. Run a vein from the midrib into the middle of each lobe, then erase the oval.
Pointed maple-style leaf
Mark a point for the base. From it, draw five light guide lines fanning out like the fingers of an open hand: one straight up, one angled to each side, and one shorter line pointing outward and slightly down on each side. The center line is the longest and the two lowest lines are about half its length. Draw a pointed, slightly jagged lobe around each guide line, and connect neighboring lobes with a deep V notch. The five guide lines become the main veins.
Give a leaf some life
A leaf that lies perfectly flat can look cut out of paper. Three small changes make it more convincing.
- An uneven edge. Add a small nick, a shallow bite or a slight ripple somewhere along the outline.
- A turned tip. Near the tip, let one side of the outline curl over the center line and draw the small triangle of underside that shows. Shade that triangle a little darker.
- A fold along the midrib. Shade one half darker than the other, with the darkest value right beside the center line, so the leaf looks creased down the middle.
Arrange leaves into a sprig
For a sprig, draw the stem first as one long, gently curving line. Add a short center line for each leaf, angled upward and away from the stem. Place them in alternating positions, left then right, or in opposite pairs. Make the leaves smaller toward the top and finish with one leaf at the very end.
Then draw each outline around its center line, letting a few leaves overlap their neighbors. On a full tree, individual leaves give way to clumps of texture, which the tree tutorial explains. For a plant with no leaves at all, try the potted cactus sketch.
Troubleshooting
- The leaf looks stiff. The center line is straight. Redraw it with a clear curve before adding the outline.
- The veins look like a ladder. They are straight and evenly spaced. Curve them toward the tip and stagger them.
- The maple-style leaf looks like a star. The lobes are too narrow and even. Widen the middle of each lobe and add one or two small side points.
Early leaves tend to come out a little uneven, which suits the subject. Fill a page with a dozen small ones and vary the center line each time.
Frequently asked questions
What is the easiest leaf to draw?
A plain pointed oval leaf is the simplest. Draw a gently curved center line, add one curve on each side meeting at a pointed tip, then five or six side veins that bend toward the tip. Once that feels comfortable, the other shapes use the same start.
How do you draw realistic veins on a leaf?
Keep them lighter and thinner than the outline. Let each side vein leave the center line at an angle and curve toward the tip, stopping just short of the edge. Stagger the left and right veins and space them closer together near the tip.
How do I stop my leaves from looking flat?
Curve the center line so the leaf bends, shade one half slightly darker than the other, and add a small fold or a turned tip that shows a bit of the underside. A slightly uneven edge and varied line weight also help.