How to Draw a Bird: A Simple Songbird on a Branch
Draw a small perched songbird in six steps, starting with a tilted egg-shaped body and a circle head, then adding beak, wing, tail, legs and a branch. Includes simple pecking and flying poses.

This drawing at a glance
What you need
- HB pencil
- 2B pencil
- Soft eraser
- Plain paper
A small bird on a branch is mostly one shape: an egg. Tip that egg at the right angle, add a head, and the sketch already looks like something that could hop away.
Here is how to draw a bird in side view in six steps, using a simple perched songbird as the model. The stiffness that spoils many first attempts comes from a body drawn flat and level, so the tilt gets special attention along the way.
What You Need
An HB pencil for the construction lines, a 2B for the final lines and the small amount of shading, a soft eraser and plain paper. Keep the egg and the circle very light; both are partly erased later. If ovals still come out lumpy, a few minutes of practice with basic shapes will help more than anything else.
Set the Tilt First
Before drawing anything, decide how the bird is sitting. Lightly draw a slanted line across the middle of your page, rising toward the left at roughly the slope of a gentle hill. This is the axis of the body, and the bird will face left.
A steeper tilt makes the bird look alert and upright. A flatter one makes it look relaxed or ready to peck. Both work; a perfectly level body is the only version that tends to look lifeless.
Draw the Bird in Six Steps
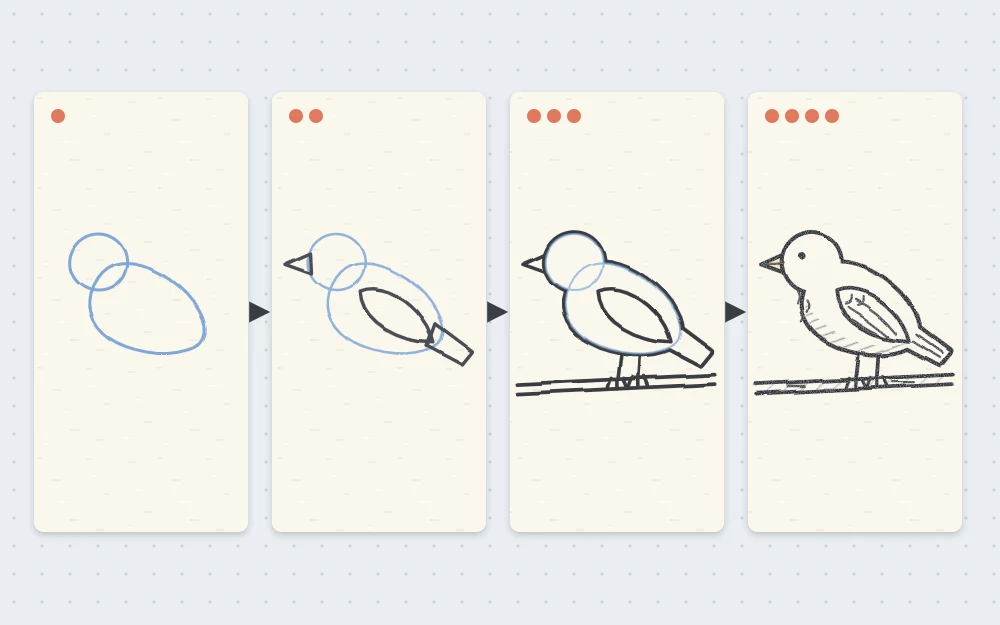
- Body. Along the slanted line, draw an egg shape about 2.5 in (6 cm) long. The wider, rounder end is at the upper left, where the chest will be; the narrower end points down to the right.
- Head. Draw a smaller circle overlapping the upper end of the egg, so about a third of the circle sits inside the body. Proportion check: the head is roughly half as wide as the body is long.
- Beak. On the left side of the head, slightly below the middle, add a short triangle. Keep it small, no longer than a third of the head’s width, and split it with one line for the mouth.
- Tail and wing. From the narrow lower end of the egg, extend a narrow wedge for the tail, about half the length of the body and following the same slant. Then draw the wing as a teardrop lying along the body: its rounded end sits near the shoulder, just behind the head, and its point reaches toward the base of the tail.
- Legs and branch. Draw two thin legs from the underside of the body, a little behind its middle, each a short pair of lines angling slightly forward. Under them, draw a branch as two roughly parallel, slightly wobbly lines running across the page. Wrap three small curved toes over the top of the branch for each foot. Now refine the outline, smoothing the joins between head, body and tail.
- Eye, feathers and shading. Place a small round eye in the head, level with the top of the beak and close to it, leaving a tiny highlight white. Add a few curved feather lines on the wing and straight ones along the tail. Erase the construction lines, then lay a little light shading under the belly.
Tip
Place the eye close to the beak. An eye in the center of the head makes a bird look surprised; one set forward looks natural.
Keep the Feathers Simple
It is tempting to cover the whole bird in feather marks. Three small groups are enough, and the smooth, empty areas between them are what make the bird look soft.
- Wing. Two or three rows of short curved lines near the pointed end of the teardrop, each row overlapping the next like roof tiles.
- Tail. Three or four straight lines running the length of the wedge, with a slightly notched tip.
- Chest. A handful of tiny broken strokes along the outline where the chest is roundest, in place of a hard continuous line.
Use a heavier line weight under the belly and on the branch, and a lighter one over the back and head, where light would fall.
Change the Pose
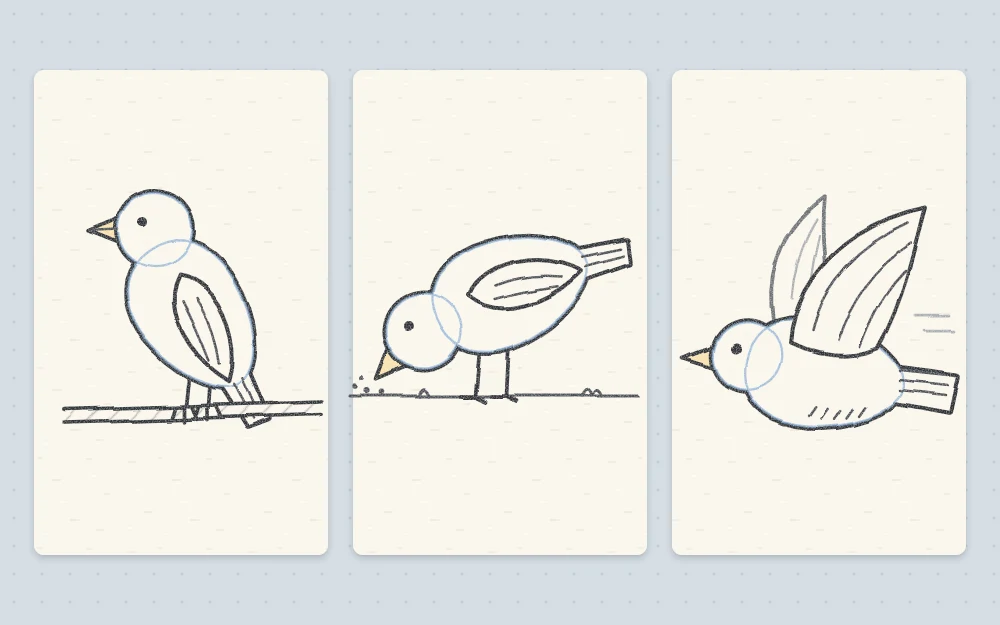
Because the body is one egg, the pose changes simply by turning it.
- Upright. Stand the egg almost vertically with the head directly above. The tail points straight down past the branch.
- Pecking. Lay the egg nearly flat and drop the head below the level of the back, with the tail lifted to balance.
- Flying. Keep a small egg body and add two long curved wings rising from the shoulders.
For distant birds in a sky, even less is needed. A shallow curved V, like a flattened letter, reads as a bird in flight. Draw several at different sizes and tilts, and keep them light so they sit far away.
Troubleshooting
- The bird looks stiff. The body is too level. Redraw the egg with more tilt.
- The bird looks like it is falling off. The legs are too far back. Move them so the feet sit under the middle of the body.
- The head looks separate. The circle does not overlap the egg enough. Push it deeper into the body so there is no neck.
- The beak looks heavy. Shorten it. Small songbirds have small beaks.
What to Try Next
Add two leaves to the branch, or give the bird a setting by extending that branch into a whole leafy tree with a trunk and crown. For another animal built on a single simple body shape, the side-view fish tutorial is a natural next step.
First birds often come out plump or lopsided. Fill a page with small ones at different tilts, each taking about a minute, and the shape settles down.
Frequently asked questions
What shapes do I need to draw a simple bird?
Five are enough: an egg for the body, a circle for the head, a small triangle for the beak, a teardrop for the wing and a narrow wedge for the tail. The legs and branch are just thin lines. Getting the egg and circle to overlap well matters more than any detail.
Why does my bird drawing look stiff?
A body drawn perfectly level is the most common reason. Perched birds sit at an angle, with the chest higher than the tail. Tilt the egg shape, tuck the head into the body without a neck, and soften the outline at the chest with a few broken strokes.
How do I draw birds flying in the distance?
Use a shallow curved V for each one, with the two sides bending gently like wings on a downstroke. Vary the size, angle and spacing so they do not look stamped, and keep the lines light. Smaller, paler marks appear farther away than larger, darker ones.