How to Draw a Cat: A Simple Sitting Cat in Six Steps
Draw a friendly sitting cat from the front in six steps: a circle head, a pear-shaped body, triangle ears, front legs, a curled tail and a simple face placed on a light guideline.
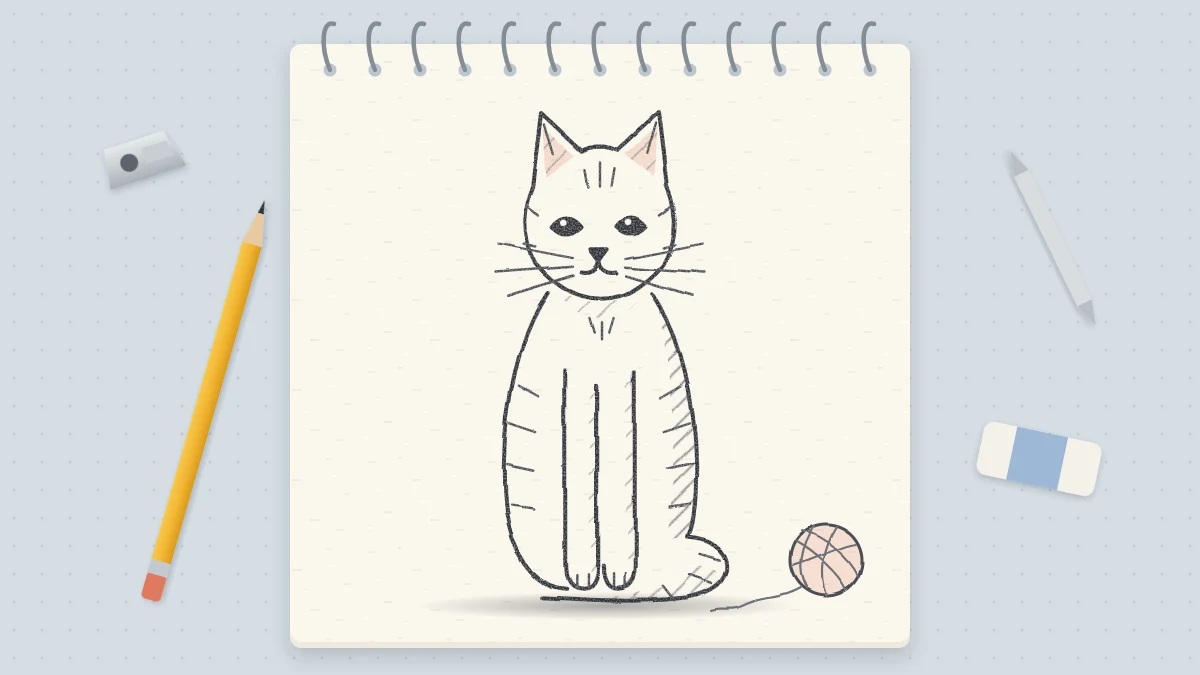
This drawing at a glance
What you need
- HB pencil
- 2B pencil
- Soft eraser
- Plain paper
A sitting cat is a forgiving first animal, because the whole pose fits inside two rounded shapes. No anatomy is needed: when the head and body sit well together, everything else is a small addition.
This tutorial shows how to draw a cat seen from the front in six steps, using a circle, a pear shape, two triangles and a handful of curves. If circles and ovals still feel shaky, warm up with a page of basic shapes drawn lightly from the arm first.
What You Need
An HB pencil for the construction lines, a 2B for the final outline, a soft eraser and any plain paper. Draw the first shapes so lightly that you can only just see them; they will be erased near the end.
The Proportions to Keep in Mind
Two checks hold this cat together. The body is about twice as tall as the head, and at its widest it is about one and a half times as wide as the head. Glance back at these two comparisons after step two, before anything else is added, because the ears, legs and tail all hang on them.
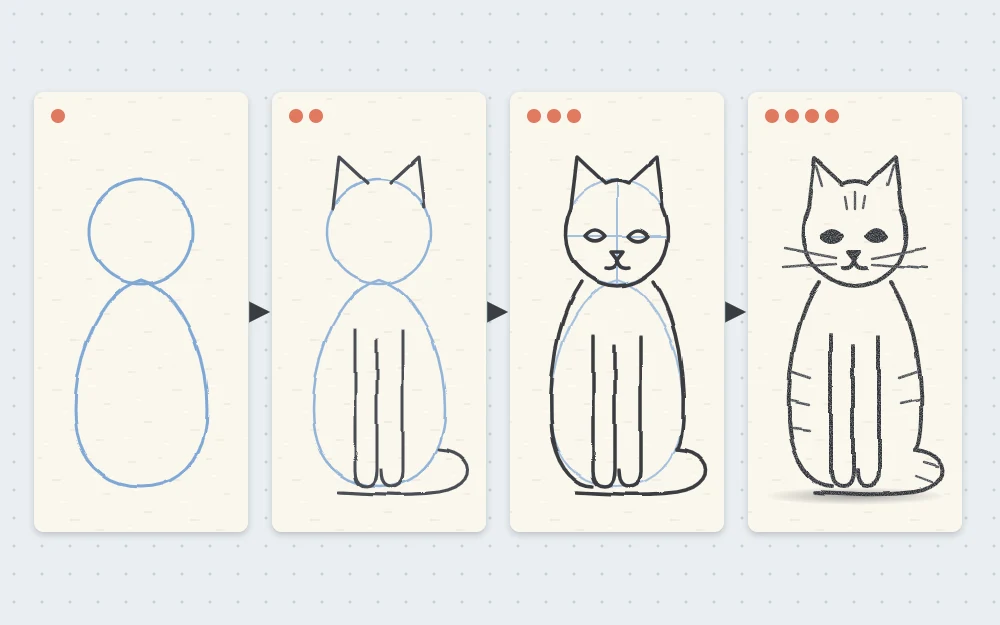
Draw the Cat in Six Steps
- Head. In the upper half of the page, draw a circle about 1.5 in (4 cm) across. It does not need to be perfect; a slightly wide circle looks even more cat-like.
- Body. Directly below, draw a larger pear-shaped oval with the narrow end at the top and the wide end at the bottom. Let the narrow end overlap the bottom of the head a little, so there is no visible neck.
- Ears. Add two triangles on top of the head. Each one starts about a quarter of the way in from the side of the circle and points up and slightly outward. Leave a gap about one ear wide between them.
- Front legs. In the middle of the body, draw two long, narrow U shapes side by side. They begin about halfway down the pear and end level with its bottom edge, where the rounded ends become the paws. Leave a thin gap between the two legs.
- Tail. From one lower side of the body, draw a long curved tube that sweeps around the base and across the front, ending in a rounded tip beside the paws.
- Face and finish. Draw a light horizontal guideline halfway down the head and a vertical center line. Place two almond eyes on the horizontal line, a small triangle nose below it and a mouth under the nose. Refine the outline with the 2B pencil, erase the construction lines, then add whiskers, a few stripes and short fur marks.
Placing the Face
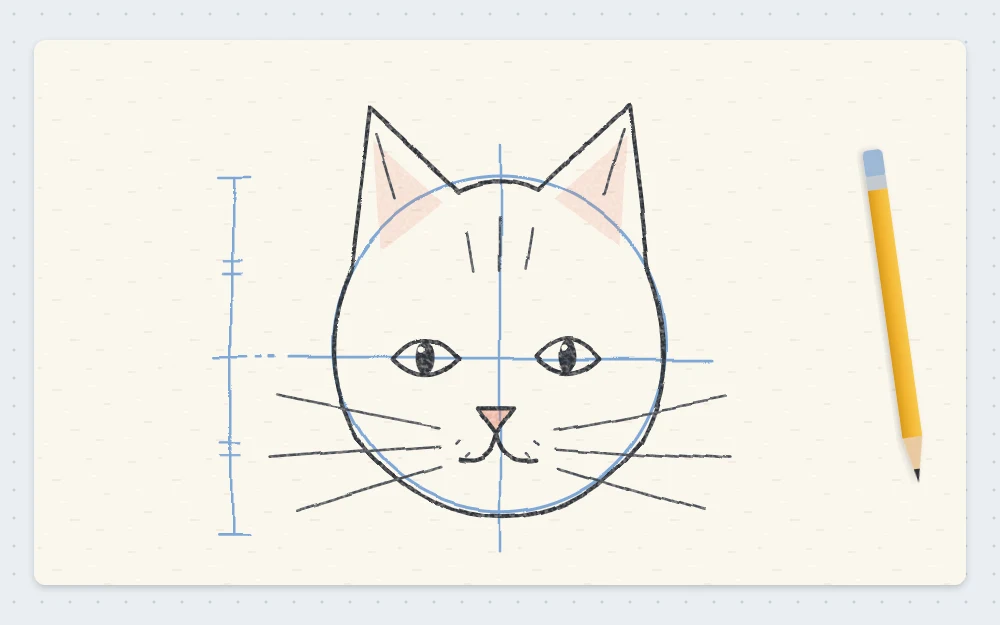
Most first cat faces put the eyes too high. Eyes belong halfway down the head, which feels low until you see it work. That is what the horizontal guideline is for.
- Eyes. Two almond shapes resting on the guideline, about one eye-width apart and the same distance from the vertical center line. Add a narrow upright pupil in each and leave a tiny highlight white.
- Nose. A small triangle pointing down, centered on the vertical line, roughly halfway between the eye line and the chin.
- Mouth. A short line dropping from the point of the nose, then two small curves swinging out to the left and right like a soft letter W.
- Whiskers. Three quick strokes on each side, starting beside the mouth and flicking outward past the edge of the head.
Tip
Draw both eyes at the same time, a few strokes on one and then a few on the other. They stay closer in size than when one is finished before the other is started.
Clean Up the Outline and Add Fur
When you go over the sketch with the 2B pencil, do not follow the construction shapes exactly. Soften the join between head and body into a gentle curve, round the tips of the ears slightly and let the chest bulge out a little between the legs.
Use a heavier line weight underneath the body, paws and tail, and a lighter one along the top of the head. Then suggest fur with a few short strokes at the cheeks, the chest and the tail tip. Five or six small marks in each place are plenty; covering the whole cat with strokes makes it look scratchy.
Easy Variations
- Stripes. Three short curved bars on the forehead, a few on each side of the body and rings around the tail. Curve them to follow the round form.
- A different tail. Stand it straight up behind the body with a hooked tip, or let it lie out to one side in a loose S curve.
- A lying pose. Swap the pear for a long, low oval and place the head circle at one end, overlapping it. Tuck the front paws under the chest as two small bumps.
For a rounder, simpler version with dot eyes, the cute doodle ideas use the same two shapes with fewer details. And once the cat feels comfortable, the side-view dog tutorial adds four legs and a muzzle.
Troubleshooting
- The cat looks like a snowman. The body is too round. Narrow the top of the pear and widen the bottom.
- The face looks startled. The eyes are too round or too high. Flatten them into almonds and lower them to the guideline.
- The ears look like horns. They are too narrow or too close together. Widen each base and move them apart.
- Gray smears remain after erasing. The construction lines were pressed too hard. Next time, hold the pencil farther back and let its own weight make the line.
A first cat is usually a bit lopsided. Draw three more on the same page, changing one thing each time, and compare the first with the last.
Frequently asked questions
What is the easiest cat pose to draw?
A cat sitting upright and facing you is the simplest, because the back legs are hidden and the body is nearly symmetrical. You only need a circle, a pear shape and two front legs. Side views and walking poses add more legs and a spine curve, so save those for later.
Where do the eyes go on a cat's head?
About halfway down the head, which is lower than most people expect. Draw a faint horizontal line across the middle of the head circle and rest both eyes on it, leaving roughly one eye-width between them. The nose then sits on the center line below.
How do I draw fur without making the cat look messy?
Use fewer marks than you think you need. Add short strokes only where the outline changes direction, such as the cheeks, chest and tail tip, and leave the remaining outline smooth. Make each stroke follow the direction the fur would grow, and keep them lighter than the outline.