Drawing Proportions: How to Measure by Eye With a Pencil
Learn to judge sizes by eye with nothing but a pencil held at arm's length. Includes a worked example of a bottle three units tall, plus angle and negative space checks.

This drawing at a glance
What you need
- HB pencil
- 2B pencil
- Soft eraser
- Plain paper
- A bottle or mug to measure
A sketch can have clean lines and careful shading and still look wrong, because one part is simply the wrong size. The mug is as wide as it is tall, the bottle has a stubby neck, the dog’s legs are too long for its body. That is a measuring problem, not a talent problem.
Drawing proportions well comes down to one habit: comparing sizes before you commit to a line. The only tool you need is the pencil already in your hand, plus a few seconds of careful looking. The method below works for a bottle on the table, a chair across the room or a pet asleep on the sofa.
What proportion means
Proportion is the size of one part compared with another. It has nothing to do with inches on the page. A bottle drawn 3 in (8 cm) tall and one drawn 9 in (23 cm) tall are both correct as long as the height is still three times the width.
That is why measuring by eye works. You are not finding real sizes, only relationships: this is twice that, this is half as wide as it is tall. Wrong relationships are among the most common problems in early sketches, and among the easiest to fix.
How to sight-measure with a pencil
- Sit or stand where you can see the whole subject, and stay there. Moving your head changes every measurement.
- Hold the pencil at full arm’s length with your elbow locked. A bent arm gives a different result each time.
- Close one eye and line the pencil tip up with the top of the part you are measuring.
- Slide your thumb down the pencil until it meets the bottom of that part. The distance from tip to thumb is your unit.
- Keep your thumb in place, move the pencil to another part and count how many times the unit fits.
Tip
Turn the pencil sideways to measure widths, but keep it flat, as if pressed against a window. Tilting it toward the subject shortens the measurement.
Choose one unit and compare everything to it
Pick one clear, medium-sized part as your unit and keep it for the whole drawing. For a still life it might be the height of a mug. For an animal it is usually the head: a standing dog in side view has a body about two head-lengths long, and that single check prevents most stretched or squashed results.
Start with the two biggest questions:
- Width against height. Is the whole subject taller than it is wide, and by how much?
- The halfway point. What sits at the middle of the subject’s height? Mark it on your page.
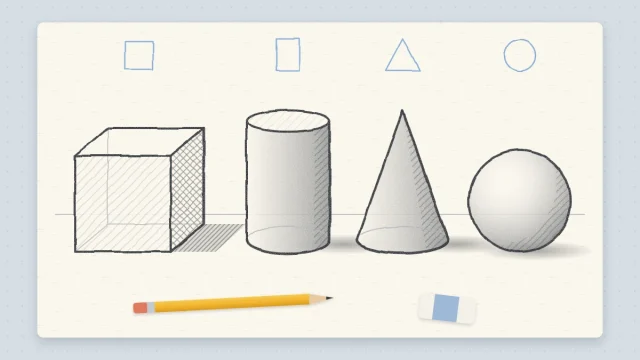
Then draw a light box, sometimes called an envelope, that the whole subject would just fit inside. If the box is right, everything inside it has a far better chance of being right. It is the same idea as building a sketch from basic shapes: large and simple first, details last.
Worked example: a bottle three units tall
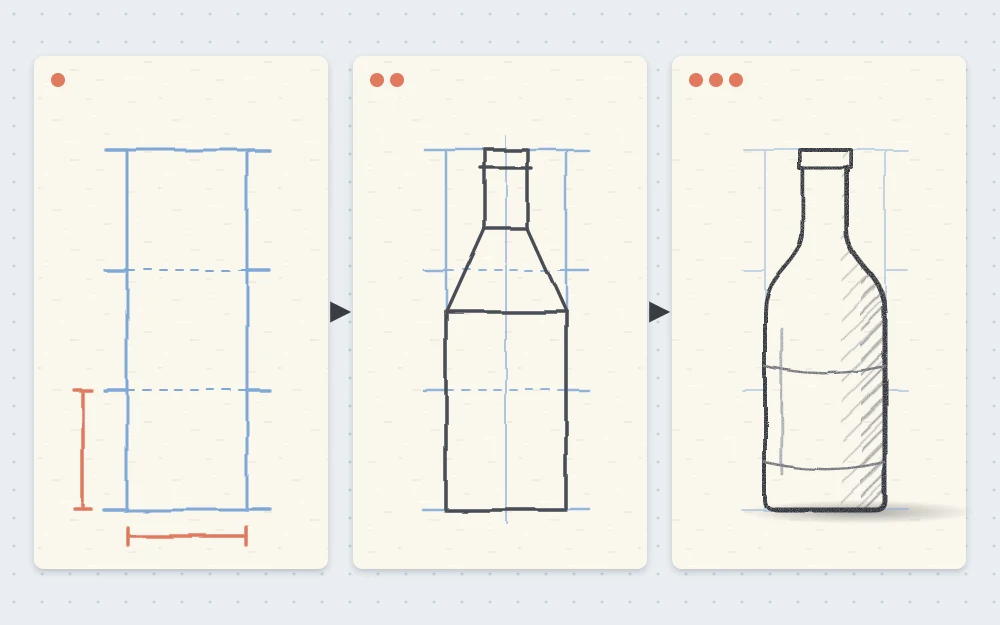
Stand a plain bottle on a table. Measure its widest point with the pencil, then count how many times that width fits into the height. For a typical tall bottle the answer is about three, so the bottle is three units tall and one unit wide.
- Draw the box. With an HB pencil and very light pressure, draw a tall rectangle about 6 in (15 cm) high and 2 in (5 cm) wide.
- Mark the units. Make two small tick marks on one side to divide the height into three equal parts. Each part should be as tall as the box is wide.
- Block in the body. Sight-measure where the straight body ends on the real bottle. Here it fills the lower two units, so draw the body as a rectangle touching both sides of the box, up to the second tick mark.
- Add the shoulder and neck. In the top unit, draw two short sloping lines for the shoulder, then a narrow rectangle for the neck, centered and about a third as wide as the body.
- Draw the outline. Switch to a 2B pencil. Round the corners of the shoulder and base and go over the bottle with one smooth outline. Erase the box gently or leave it faint.
Check angles with the pencil
Sloping edges are hard to judge because the brain wants to straighten them. Hold the pencil at arm’s length and tilt it until it lies along the edge, such as the bottle’s shoulder or the side of a roof. Keeping your wrist locked, bring the pencil down to the paper and compare the tilt with your line.
Use negative space as a second check
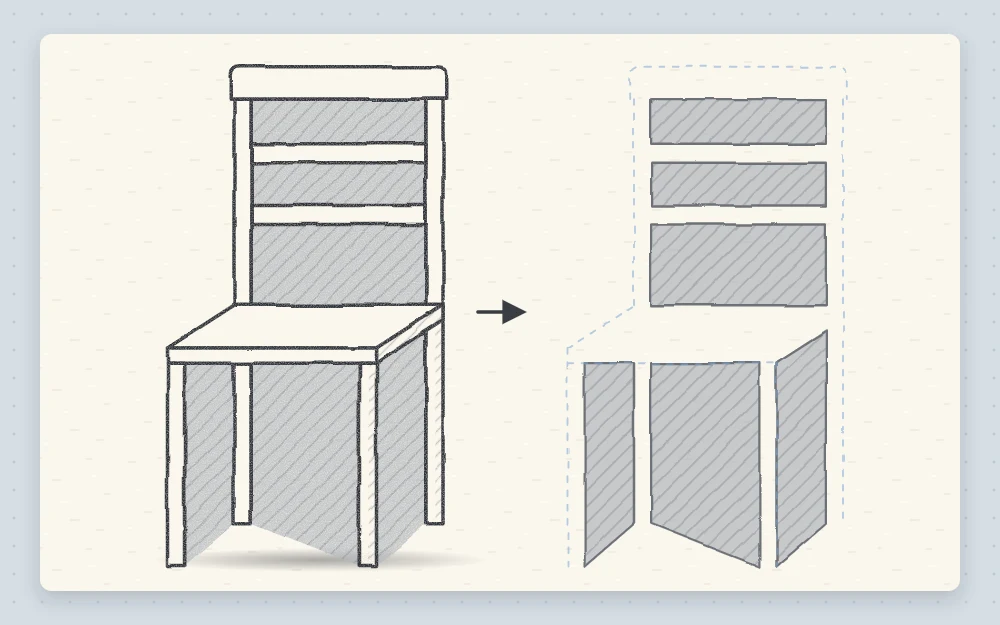
Negative space is the empty shape around and between the parts of a subject: the gap between chair legs, the patch of air inside a mug handle. These shapes have no name, so your brain has no stored symbol for them and you see them as they really are.
If a drawing feels wrong and you cannot find the error, stop looking at the object and look at the gaps. Compare each one with the same gap on your page. A gap that is too narrow or too tall points straight to the part that needs moving.
When the drawing still looks off
- Everything is too wide. Check the envelope first. Measure width against height again before changing any detail.
- The measurements keep changing. Your arm is bending or your head has moved. Lock the elbow and return to the same position.
- The top is crowded. You probably started at the top and ran out of room. Mark the top, bottom and halfway point before drawing anything else.
- The guidelines will not erase. They were pressed too hard. Keep construction lines faint enough that you can barely see them.
What to try next
Measure three objects of different shapes: a mug, a book standing upright and a pear. For each one, find the width-to-height relationship and draw only the envelope and two or three tick marks. It takes roughly a minute per object and builds the comparison habit without the pressure of a finished drawing.
With practice you begin to estimate first and use the pencil only to confirm. First attempts are usually uneven, and that is fine: every check you make sharpens the next guess.
Frequently asked questions
Why do I have to keep my arm straight when measuring with a pencil?
A locked elbow keeps the pencil at the same distance from your eye every time. If your arm bends even slightly, the pencil moves closer and the same object appears to cover less of it, so two measurements taken a moment apart no longer agree with each other.
Do I need a ruler to get proportions right?
No. A ruler measures real sizes, and a drawing only needs relationships between sizes, such as a height that is three times the width. A pencil and your thumb are enough to compare one part with another, and they work on subjects that are too far away to reach.
What is the best unit to measure with?
Choose a part that is easy to see, has clear ends and is medium in size, such as the width of a bottle, the height of a mug or the head of an animal. A very small unit is hard to count accurately, and a very large one tells you little about the smaller parts.