Line Control Exercises: 8 Drills for Steadier, More Confident Lines
Eight pencil drills for smoother strokes, from dot-to-dot lines to ghosted circles, with advice on drawing from the shoulder, rotating the paper and using line weight to add depth.
This drawing at a glance
What you need
- HB pencil
- 2B pencil
- Sharpener
- Plain paper
A wobbly or hairy line is not a sign that you cannot draw. It usually means the stroke came from the fingers, was made too slowly, or was patched together from short pieces. Line control exercises retrain the movement itself, so that a line starts where you want, ends where you want, and stays smooth in between.
Below are eight drills, from plain straight lines to ghosted circles, followed by notes on line weight. You need an HB pencil, a softer 2B for the pressure drill, and a stack of plain paper you are happy to fill.
Why the shoulder beats the fingers
Your fingers can only move the pencil point a short distance before they run out of reach. Past that distance the stroke bends into a small arc, and you have to stop and restart, which leaves a join. Your wrist reaches a little farther but still swings in a curve.
Your elbow and shoulder are large hinges with a long reach. When the movement comes from them, the pencil travels in a broad, even path, and the line stays smooth across the whole page. Use the fingers for details smaller than a coin and the arm for everything longer.
Set up for smooth strokes
- Rotate the paper. Everyone has a direction that feels natural, often a diagonal pulling toward or away from the body. Turn the sheet so each stroke runs in that direction instead of twisting your arm.
- Ghost the stroke. Hover the point above the paper and rehearse the movement two or three times before you let the pencil touch down.
- Keep a steady pace. Too slow and every tremor shows; too fast and you overshoot. A calm, even speed works best.
- Stay light. Light lines flow more easily and erase cleanly.
The eight drills
Give each drill about two minutes, or pick three or four for a shorter session. Do not erase; simply draw the next attempt beside the last.
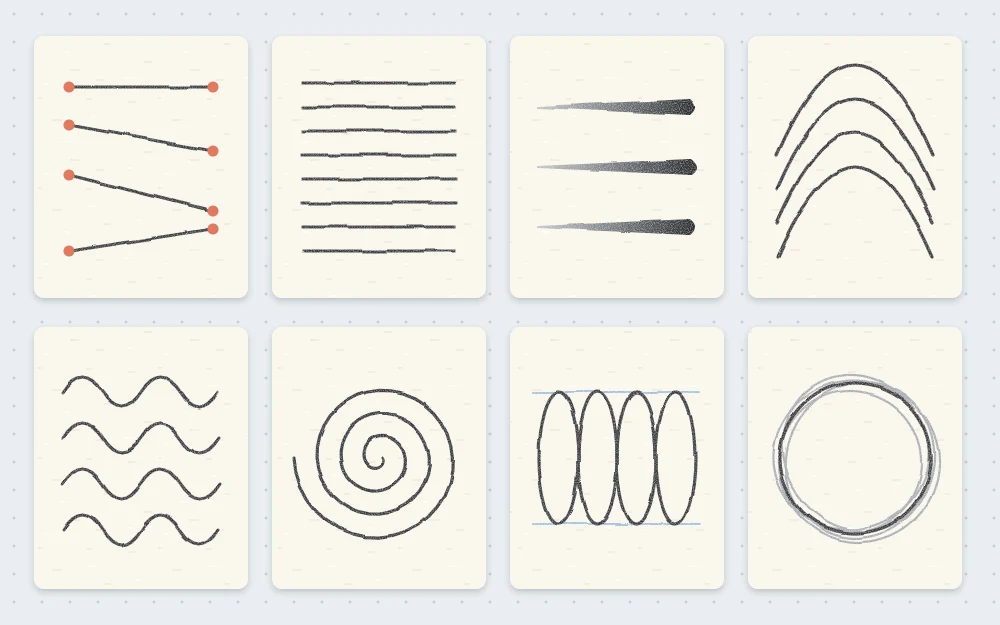
- Dot-to-dot straight lines. Place two dots about 4 in (10 cm) apart. Ghost the path, then join them in one stroke. Check whether the line reached the second dot, fell short or overshot, and adjust on the next pair.
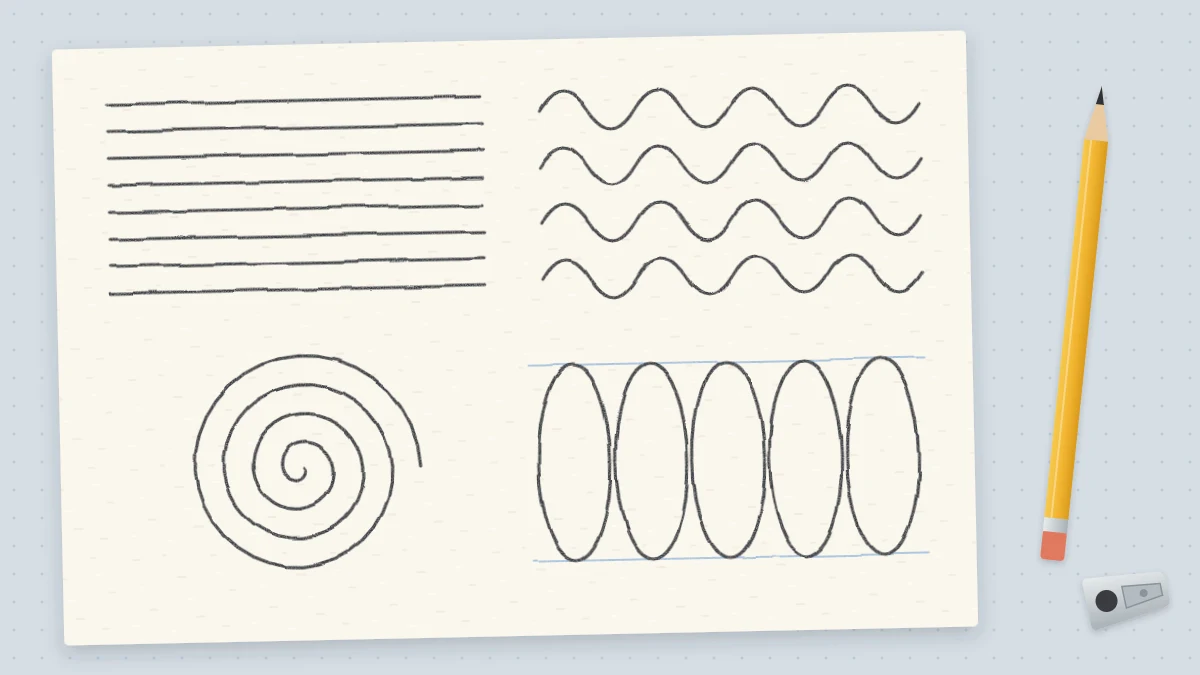
- Parallel lines. Draw a row of straight lines of equal length, side by side, with even gaps of about a quarter inch (6 mm). Then try a set of horizontals and a set of diagonals.
- Light to dark. With a 2B pencil, draw a single stroke that begins almost invisible and gradually darkens as you add pressure. Then reverse it, dark to light. Aim for a smooth change with no sudden jump.
- Long curves. Draw sweeping arcs across the width of the page, like shallow rainbows, moving from the shoulder. Repeat each arc directly beside the previous one, keeping the gap even.
- Waves. Draw a line of smooth, even waves from one side of the page to the other. Keep the peaks the same height and the same distance apart, then draw a second row following the first.
- Spirals. Start at the center and wind outward with an even gap between the rings. Then draw one starting from the outside and winding in. Try both directions.
- Ellipses in a row. Draw two light parallel lines about 1 in (2.5 cm) apart and fill the space between them with ellipses that just touch both lines and each other. Go around each one twice.
- Ghosted circles. Circle the pencil above the paper several times, then lower it mid-motion and let it draw two or three overlapping loops. Vary the size from a coin to the width of your palm.
These drills also make a good extended version of the first blocks in the ten-minute daily warm-up.
Troubleshooting common line problems
- The line arcs when it should be straight. You are pivoting from the wrist or elbow alone. Let the shoulder take part and rotate the paper to a friendlier angle.
- The line wobbles. You are drawing too slowly or gripping too tightly. Loosen your hand and speed up slightly.
- The line is hairy. You are building it from short strokes. Commit to one pass, even if it lands in the wrong place.
- Ellipses have pointed ends. Keep moving through the turn instead of pausing there.
Common mistake
Judging a drill by how neat the page looks. The goal is the movement, so a page of smooth lines that miss their dots is better progress than a page of slow, shaky lines that hit them.
Draw through your shapes
Drawing through means completing a shape as if it were made of glass, including the parts you will not see in the finished sketch. When you draw an ellipse for the rim of a cup, go all the way around instead of stopping at the visible front edge. The full loop keeps the curve even and the two halves matched.
The habit pays off as soon as you begin building subjects from basic shapes, where overlapping circles and ovals need to keep their form even when half of each is hidden.
Line weight: thin and thick
Line weight is how thick or dark a line is. A drawing made with one even weight looks flat, like a diagram. Varying the weight suggests light, overlap and distance, which makes a simple outline look more solid.
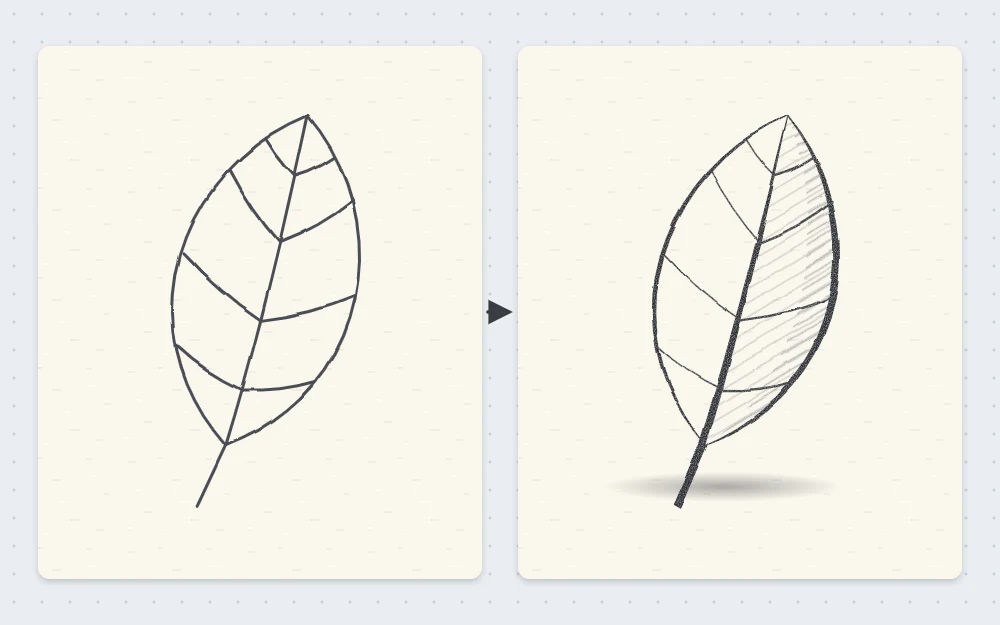
A few guidelines are enough to begin with:
- Make lines thicker on the side away from the light and along the underside of an object.
- Thicken the line where one form passes in front of another.
- Keep lines thin and light on the side facing the light and for small inner details, such as the veins of a leaf.
The light-to-dark drill is your practice for this. Once you can change pressure smoothly within a single stroke, you can let an outline swell and thin as it travels around a shape. Line weight hints at shadow; for actual tone, the next step is simple shading with hatching and blending.
How to keep improving
Steadier lines come from many short sessions, not from one determined afternoon. Date your drill pages and compare them every couple of weeks. Look for longer strokes, fewer restarts and more even gaps.
When a drill becomes easy, make it harder: move the dots farther apart, shrink the gaps between parallels, or draw the waves with a changing line weight.
Frequently asked questions
Why are my lines shaky when I draw?
Shaky lines usually come from moving slowly, gripping the pencil tightly and drawing with the fingers alone. Relax your hand, hold the pencil a little farther back, and make the stroke at a calm, steady pace from your elbow or shoulder. Rehearsing the stroke above the paper also helps.
How long does it take to get steadier lines?
It varies from person to person, so there is no honest fixed answer. Most people notice their strokes becoming longer and smoother gradually, over weeks of short, regular sessions. Dating your drill pages and comparing them later is the most reliable way to see the change.
Should I use a ruler for straight lines?
A ruler is fine when a sketch truly needs a precise edge, such as a ground line. For practice, draw straight lines freehand, because a ruler does the work your arm needs to learn. Slightly imperfect freehand lines also tend to suit a pencil sketch better.