How to Draw a House: An Easy Step-by-Step Tutorial
Draw a tidy front-facing cottage in six steps, from a square and a triangle roof to windows, a chimney, a path and a bush, then add an optional side wall for a 3D look.
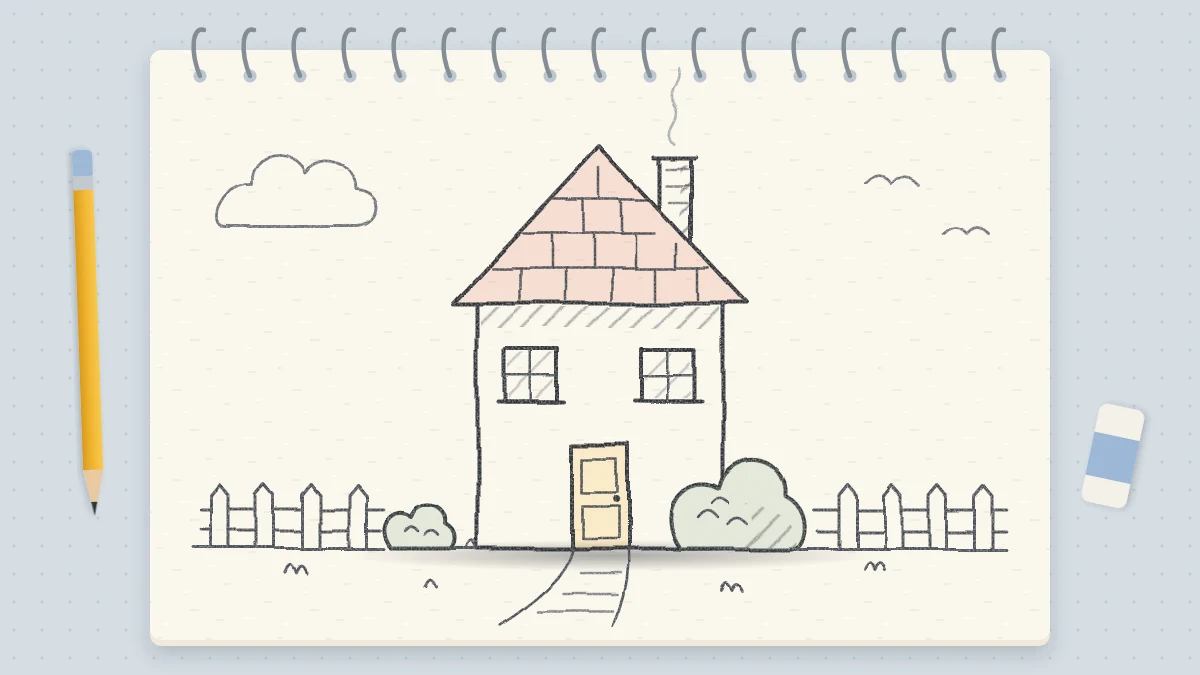
This drawing at a glance
What you need
- HB pencil
- 2B pencil
- Soft eraser
- Plain paper
- Ruler (optional)
A small cottage is one of the most forgiving subjects you can choose: a square, a triangle and a handful of rectangles. The challenge is not the shapes themselves but keeping them tidy, with upright walls, evenly spaced windows and a roof that sits straight.
This guide to how to draw a house takes you through a front-facing cottage in six steps, with a proportion check along the way. Once the flat version works, an optional extra stage turns it into a simple three-dimensional building.
What you need
Use an HB pencil for the light construction lines and a 2B for the final outline, plus a soft eraser and any plain paper. A ruler is optional. Drawing the lines freehand is better practice, but there is nothing wrong with using a straight edge to check them afterward.
Draw the house in six steps
- Walls. Lightly draw a square about 4 in (10 cm) on each side, leaving space above it for the roof. Check that the two sides are parallel to the edges of your paper.
- Roof. Make a small mark above the middle of the square, about half the wall height above the top edge. Draw a straight line from that mark down to each side, ending roughly 1/4 in (6 mm) beyond the wall, and join the two ends with a line along the top of the walls. That slight overhang is what makes the triangle read as a roof.
- Door. Draw a tall rectangle standing on the bottom edge of the square, centered. Make it about one-fifth of the wall’s width and a little less than half its height.
- Windows. Draw one square window on each side of the door, each about one-fifth of the wall’s width. Line their tops up with the top of the door.
- Chimney. On one slope of the roof, about halfway between the peak and the eave, draw a small upright rectangle. Its sides stay vertical, and its bottom edge follows the slope of the roof.
- Details and outline. Divide each window with a cross to make four panes. Add a few horizontal lines across the roof for rows of tiles, a small dot for the door handle, a path that widens as it comes toward you and a rounded bush beside the wall. Then go over the lines you want to keep with the 2B pencil.
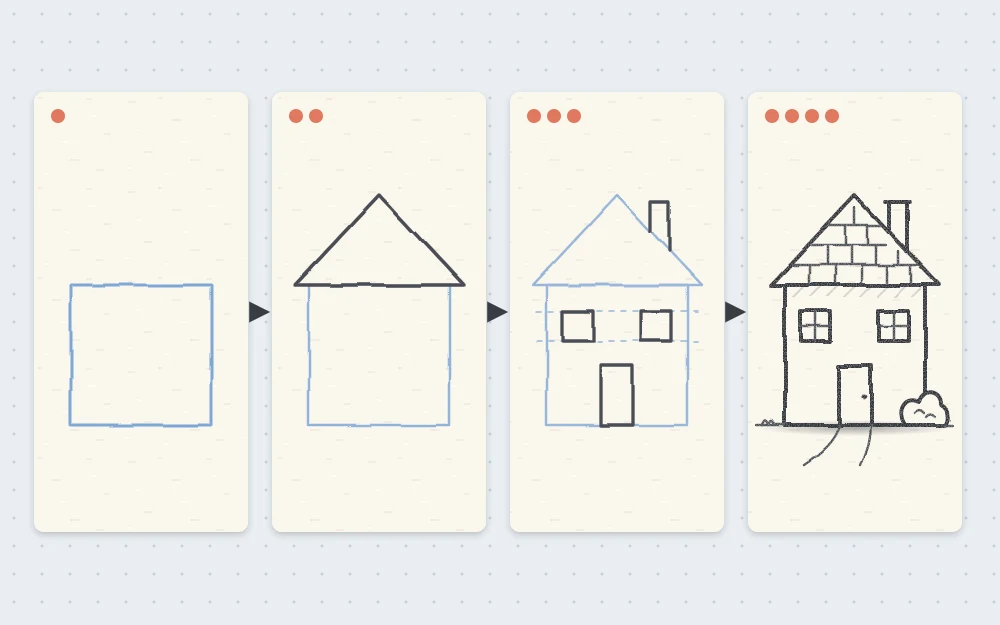
Proportion check: the roof should be about half as tall as the walls. A much taller roof looks like a steep chalet, and a much flatter one looks like a shed.
How to keep the walls upright
Leaning verticals are the most common problem in building sketches. A few habits help:
- Use the side edges of the paper as a reference. Every wall, door edge and window side should run parallel to them.
- Draw vertical lines with a downward pull of the whole arm, not a flick of the wrist, which tends to curve.
- Turn the page a quarter turn and look again. A lean that was hard to see upright becomes obvious sideways.
Tip
Place two light dots where a line should start and end, then join them in one stroke. It is far easier to aim at a dot than to steer a line as you go.
Spacing the windows evenly
Windows that drift up, down or sideways make a house look crooked even when the walls are straight. Before drawing them, add three sets of guidelines:
- A faint horizontal line across the wall at the height of the door’s top. The window tops sit on it.
- A second faint horizontal line for the window bottoms, so both are the same height.
- A small tick on each side, the same distance in from each wall. The gap between a window and the wall should match the gap between that window and the door.
Draw the windows inside those guides, then erase the extra lines gently. Because the construction lines were light, they should lift without leaving a groove.
Optional: add a side wall
To turn the flat cottage into a solid one, give it depth on one side.
- From the top and bottom corners of one wall, draw two short lines slanting upward and away from the house. Keep them parallel and about one-third as long as the front wall is wide.
- Join their ends with a vertical line. That is the far corner of the side wall.
- From the roof peak, draw a line with the same slant and length. Connect its end to the top of the far corner with a line parallel to the roof slope on that side.
- Shade the side wall lightly so it reads as a separate surface from the front.
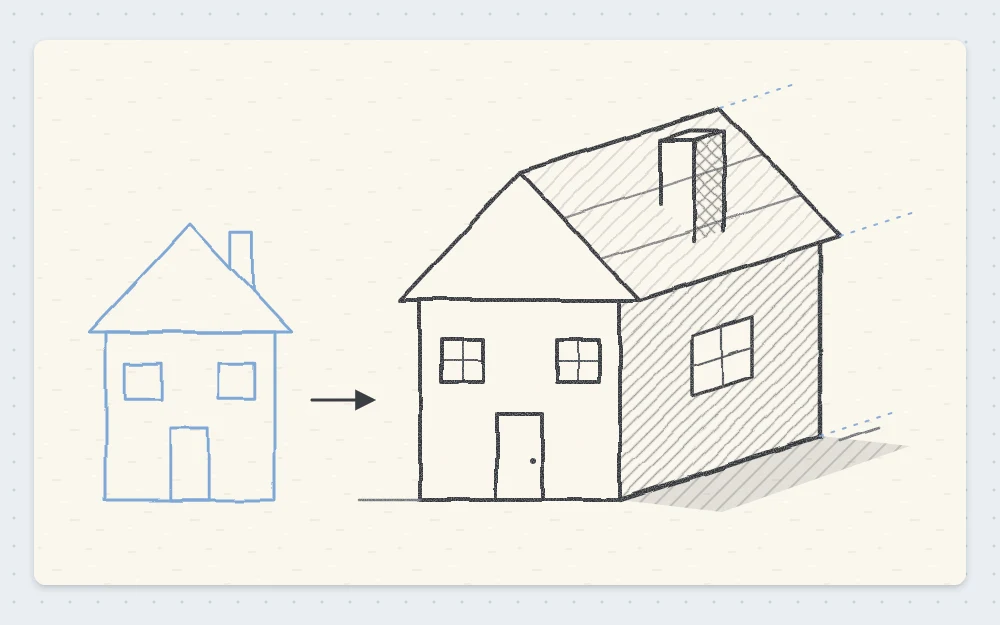
This is the same idea as turning a square into a cube. If the slanting lines feel confusing, the lesson on drawing a cube and other solid forms explains it from the beginning.
Troubleshooting
- The roof looks off-center. The peak is not above the middle of the wall. Find the midpoint of the top edge and move the peak directly above it.
- The door looks too big. Compare it with the wall. It should be under half the wall’s height.
- The house looks as if it floats. Extend the ground line a little past each wall and let the path and bush sit on it.
- The roof lines look messy. Use fewer of them. Three or four evenly spaced rows suggest tiles better than a dozen.
Easy variations and what to draw next
Small changes give the cottage a different character. Try a round window in the roof triangle, shutters as narrow rectangles beside each window, a low fence of short vertical strokes, or curls of smoke from the chimney. A taller rectangle for the walls makes a town house, and a wider one makes a bungalow.
A house also looks more settled with something growing next to it, so consider adding a leafy tree with a proper trunk and crown at one side. When you are ready for shops, barns and towers, the guide to sketching other simple buildings uses the same box-plus-roof approach.
First houses often lean or come out lopsided. Draw a second one straight away, a little smaller, and you will usually see a clear difference.
Frequently asked questions
Should I use a ruler to draw a house?
You can, but try freehand first. Drawing straight lines without a ruler is a useful skill, and slightly uneven lines give a sketch warmth. If the walls keep leaning, use a ruler only to check them, then correct the lines by hand.
How do I make my house drawing look 3D?
Add a side wall. Draw two short parallel lines slanting away from the top and bottom corners of one wall, join them with a vertical line, then run a matching slanted line from the roof peak. Light shading on the side wall separates it from the front.
Why does my roof look crooked?
The peak is probably not centered. Find the middle of the wall's top edge, mark a point directly above it and draw both roof slopes from that point. Also check that the overhang is the same length on each side, since an uneven one makes the whole roof look tilted.