How to Draw Fruit: Apple, Pear and Banana Step by Step
Draw an apple, a pear and a banana from basic shapes, then arrange them as an overlapping still life with one light direction, rounded shading and cast shadows that sit them on the table.

This drawing at a glance
What you need
- HB pencil
- 2B pencil
- Soft eraser
- Plain paper
- An apple, a pear and a banana
Fruit is a classic first still-life subject for good reasons. It sits still, the forms are simple and rounded, and a slightly lumpy apple is still clearly an apple.
This guide shows how to draw fruit using three familiar pieces: an apple, a pear and a banana. Each one starts from a basic shape. Then you arrange them as a small group, light them from one side and give them shadows so they sit on the table.
What you need
An HB pencil for the construction lines, a 2B for the outlines and shading, a soft eraser and plain paper. Put a real apple, pear and banana on a table near a window or a lamp, so the light falls from one side.
All three begin as circles or curves, so if those feel shaky, a short warm-up from the guide on drawing basic shapes is worth doing first.
How to draw an apple
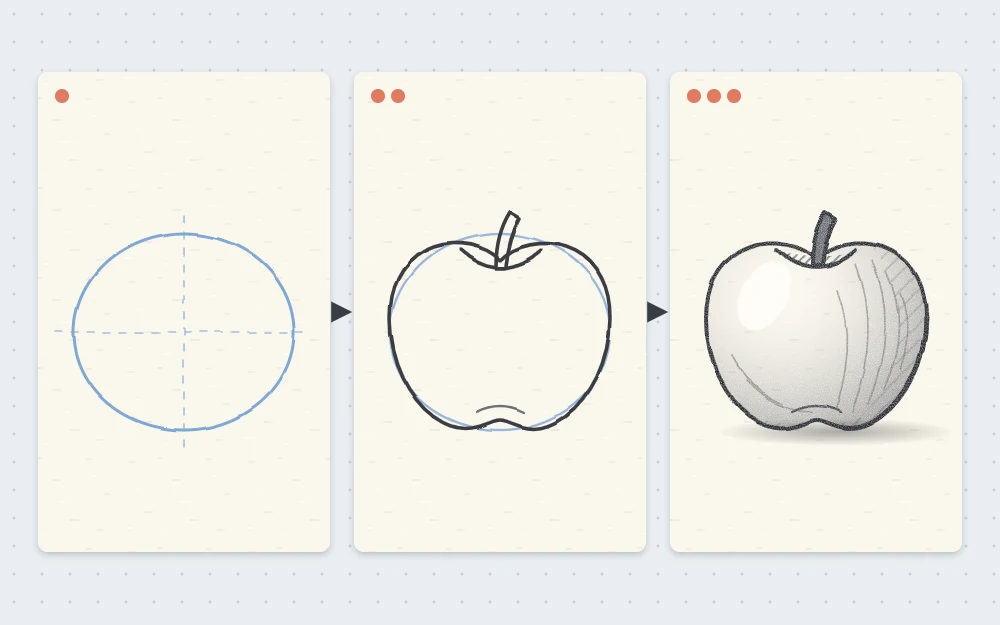
An apple is close to a sphere, but not quite. It is a little wider than it is tall, and wider at the shoulders than at the base. Draw it about 3 in (7.5 cm) across.
- Draw a slightly squashed circle. Use light, loose strokes. Proportion check: the height is about nine tenths of the width.
- Add the dip and the stem. At the top, a little off center, draw a small shallow curve like a smile for the hollow where the stem sits. Draw the stem as two short lines rising from the middle of that hollow, leaning to one side, with a blunt end. Near the bottom, add a faint upward curve to suggest the underside turning in, and narrow the lower outline slightly.
- Shade the form. With the light from the upper left, leave a small highlight on the upper left as clean paper. Lay tone over the right and lower parts with curved strokes that follow the round surface, and add a cast shadow on the table to the right.
How to draw a pear
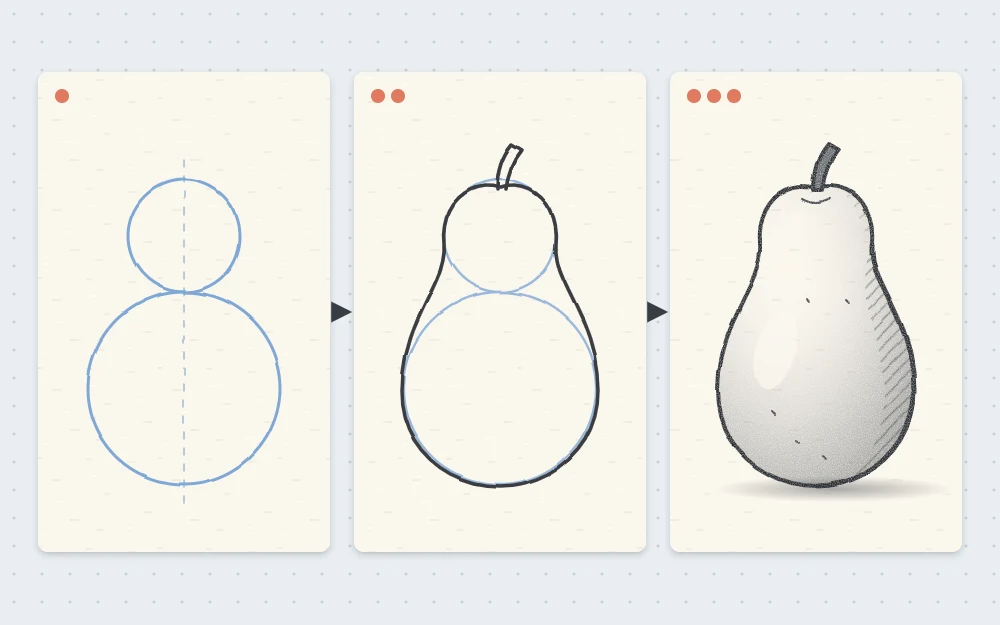
A pear is two circles of different sizes, stacked. Draw it about 4 in (10 cm) tall.
- Stack a small circle on a large one. Draw the large circle first, about 2.5 in (6.5 cm) across. Sit a smaller circle directly on top, just touching it or overlapping very slightly. Proportion check: the small circle is about half as wide as the large one.
- Join them and add the stem. On each side, draw a smooth concave curve from the widest point of the small circle to the widest point of the large one, like a gentle waist. Draw a short, slightly bent stem at the top.
- Erase and shade. Rub out the parts of the circles inside the outline. Shade the right side softly, darker on the wide lower half, and add a cast shadow on the table.
How to draw a banana
A banana is not a smooth tube. It has flat sides, usually three visible at once, with soft ridges between them. Draw it about 6 in (15 cm) long.
- Draw a long curved band. Draw one long curve like a shallow smile. Draw a second curve below it that follows the first, slightly farther away in the middle and closer at both ends. The band is about one sixth as wide as it is long at its thickest point.
- Shape the blunt ends. At one end, narrow the band into a short, squared-off stem. At the other, taper it to a small, dark, blunt tip. Neither end should be a sharp point.
- Add the facets. Draw one or two faint lines along the length of the banana, following its curve from stem to tip. These are the ridges that divide it into flat faces.
- Shade the faces. Leave the upper face light, give the middle face a light tone and the lowest face a darker one. Three clear values make the angular form readable.
Arrange the three as a group
Three objects in a row look like a lineup. Overlap them and they become a still life. Stand the pear at the back, set the apple in front and slightly to one side so it hides part of the pear, and lay the banana across the front or lean it against the apple.
Before drawing any single fruit, lightly block in the whole group as three simple shapes and compare them. The pear is the tallest; the apple reaches about two thirds of its height; the banana is the longest shape and stays low. Check the gaps between them, the negative space, as well.
Light, shading and cast shadows
Choose one light direction and apply it to all three. If the apple’s highlight is on the upper left, the pear’s and the banana’s are too, and every cast shadow falls to the right. Each round fruit follows the same pattern: a highlight, a gradual darkening, a core shadow on the far side, and a cast shadow. The guide to simple shading techniques explains each of those parts and how to build tone in layers.
Cast shadows are what ground the group. Make each one darkest right where the fruit touches the table and softer as it spreads away.
Common mistake
Outlining each fruit with one heavy, even line and then shading inside it. Keep the outline light on the sunlit side and let the shading define the edge on the shadow side.
Variations and what to try next
- A cut apple. Draw the apple outline, then a slightly smaller matching shape inside it for the flesh, with a small pointed oval core and two seeds.
- Other round fruit. An orange is a plain circle with a dotted texture.
For another rounded subject with more surface detail, the ribs and grooves in the tutorial on drawing a pumpkin make a natural follow-up.
Troubleshooting
- The apple looks like a ball. Add the dip at the top, flatten the height slightly and narrow the base.
- The pear looks like a snowman or a light bulb. The joining curves are too tight. Make them longer and gentler, and erase the circles fully.
- The fruit seems to float. The cast shadows are missing or detached. Bring each shadow right up to the point where the fruit touches the table.
A first still life usually has a few wobbly outlines and patchy shadows. Set the pieces up again in a new arrangement; practice helps.
Frequently asked questions
What is the easiest fruit to draw for a beginner?
An apple is a good first choice because it starts from a single slightly squashed circle. Add a small dip and a short stem at the top, narrow the base a little, and shade one side. A pear, built from two stacked circles, is a comfortable next step.
How do you shade fruit so it looks round?
Pick one light direction and keep it for every piece. Leave a small highlight as clean paper, darken the tone gradually as the surface turns away from the light, and use curved strokes that follow the form. A cast shadow on the table finishes the effect.
Is it better to draw fruit from real life?
Drawing a real piece of fruit on the table is very helpful, because you can see how the light falls, where the shadows sit and how one piece overlaps another. Place it near a window or lamp so the light comes clearly from one side.