How to Draw a Coffee Cup: Mastering the Ellipse
Draw a mug that sits flat on the table in five steps, starting from a center line and one ellipse. Learn why the rim is never pointed, why the base curve matches it, and how eye level changes the shape.
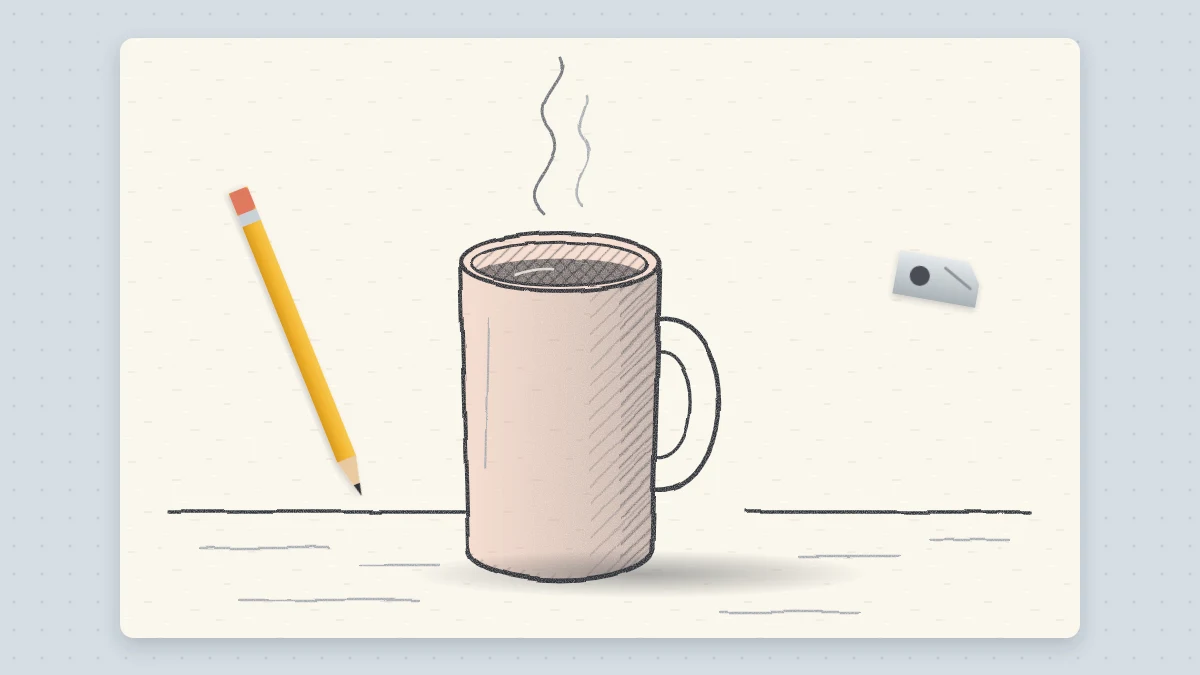
This drawing at a glance
What you need
- HB pencil
- 2B pencil
- Soft eraser
- Plain paper
- A real mug to look at
A mug looks like the easiest object on the desk until you try to sketch it. The rim comes out as a pointed almond, the bottom is a flat line, and the whole thing seems to be sliding off the table. Nearly all of these problems trace back to one shape: the ellipse.
Working out how to draw a coffee cup is really a lesson in drawing a circle seen at an angle, and then repeating that curve wherever the cup needs it. The five steps below build a plain mug on a table.
What you need
An HB pencil for the construction lines, a 2B for the final outline and shading, a soft eraser and plain paper. Put a real mug on the table in front of you, with the handle turned to the right.
Why the rim is an ellipse
The top of a mug is a circle. You only see it as a true circle when you look straight down into it. From any normal sitting position you see it tilted away from you, and a tilted circle appears as an ellipse: a smooth, even oval.
An ellipse is symmetrical top to bottom and left to right, and its ends are rounded. The pointed almond or lemon shape that most beginners draw comes from joining two separate arcs.
Tip
Before you commit, move your whole hand in the elliptical path a few times just above the paper, then lower the pencil and draw it in one or two light loops.
How to draw a mug in five steps
Draw the mug about 4 in (10 cm) tall. Keep all lines faint until the outline is right.
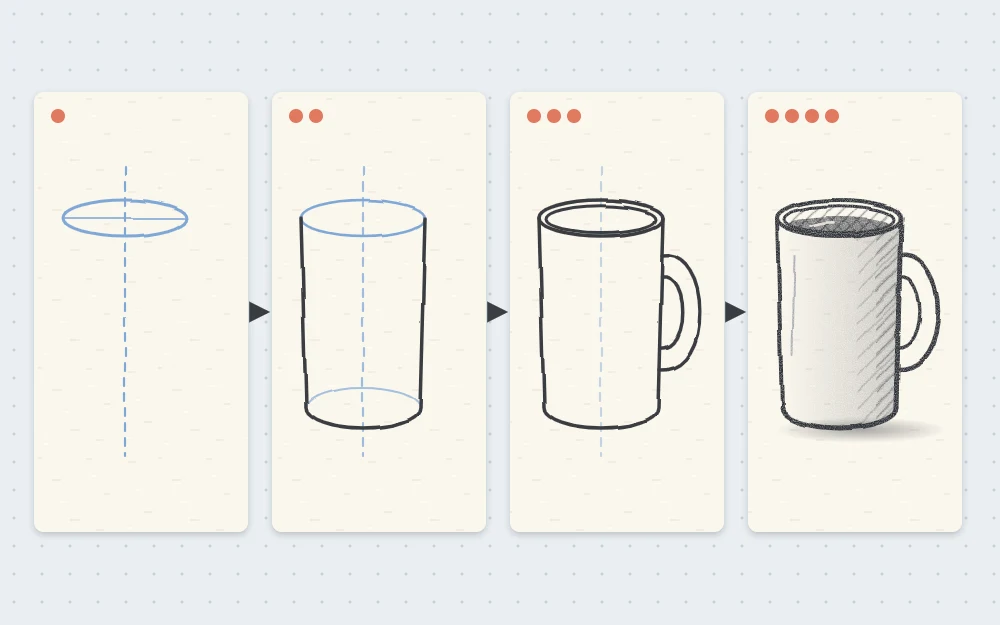
- Draw a vertical center line. Make it about 4 in long and as upright as you can. Everything else is balanced on this line.
- Draw the rim ellipse. Near the top of the center line, draw an ellipse about 3 in (7.5 cm) wide and about 1 in (2.5 cm) from front to back, with the center line passing through its middle. Check that the left half mirrors the right half and that both ends are rounded.
- Drop the sides to a curved base. From the widest points of the ellipse, draw two straight lines down, parallel to the center line or leaning inward very slightly. Join them at the bottom with a curve that bows downward, like the front half of the rim ellipse. Proportion check: the mug is about one and a quarter times as tall as it is wide.
- Add the inner ellipse. Just inside the rim, draw a second, slightly smaller ellipse. The gap between the two is the thickness of the wall; make it a little wider at the sides than at the front and back. Lower down inside, a curve parallel to the front of the rim marks the surface of the drink.
- Add the handle and the shadows. On the right side, draw a C shape that starts just below the rim and rejoins the side about two thirds of the way down. Draw a second, smaller C inside it to give the handle thickness. Then shade the right side of the mug, make the inside darker, and add a cast shadow on the table to the right.
Why the base curve matches the rim
The bottom of the mug is a circle too, the same size as the top or a little smaller. It sits on the table, slightly farther below your eye than the rim, so you see slightly more of it. That means the base curve is a touch rounder, or deeper, than the front of the rim, never flatter.
You only draw the front half, because the back half is hidden. To be sure it is right, lightly sketch the whole lower ellipse through the mug, check it, and erase the hidden part. This habit of drawing through a form is explained further in the guide on cubes, cylinders, cones and spheres.
Common mistake
A curved rim with a flat, ruler-straight base. The eye reads this as looking down at the top and straight at the bottom at once, which is why the cup seems to tip forward.
How eye level changes the ellipse
How open the ellipse looks depends on how high your eye is above the cup. The width never changes; only the front-to-back depth does.
- Nearly side-on, with the rim close to eye level, the ellipse is a very narrow sliver.
- From slightly above, as when you sit at a table, it is a medium ellipse about a third as deep as it is wide.
- From high above, standing over the cup, it opens wide and is nearly a circle.
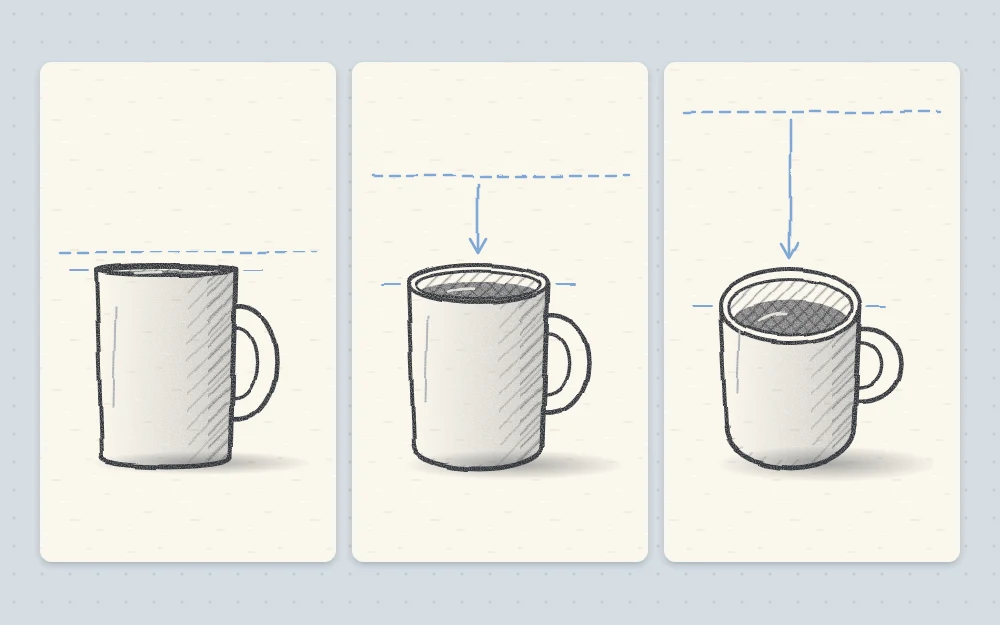
Choose one viewpoint and stay in it until the drawing is finished.
Shading the mug
With the light from the left, lay tone down the right side of the body, strongest a little in from the edge. Inside the cup the pattern reverses: the left inner wall is in shadow and the right inner wall catches the light. Shade the handle on its underside, and keep the cast shadow darkest where it touches the base.
The guide to simple shading techniques explains value, highlights and cast shadows in full.
Add a saucer or build a still life
A saucer is one more ellipse. Center it on the same vertical line, make it about one and a half times as wide as the mug, and place it so the base of the mug sits in its middle. Because the saucer lies lower than the rim, draw its ellipse slightly more open. Add a second curve just below the front edge for thickness.
Other ideas to try next:
- A thin curl of steam, drawn as two or three faint wavy lines.
- A small desk scene, with the mug beside a stack of books.
Troubleshooting
- The ellipse is pointed at the ends. Round the corners. Draw it as one continuous loop, not two arcs.
- The cup leans. The ellipse is tilted. Its long axis must cross the center line at a right angle; turn the page upside down to check.
- The handle looks stuck on. Give it thickness with the inner C, and let its ends overlap the side of the mug slightly.
Ellipses rarely come out clean at first. A row of ten quick ones before you start is a useful warm-up.
Frequently asked questions
Why does my cup drawing look tilted?
Either the rim ellipse is slanted or the two sides are uneven. Draw a faint vertical center line first, make sure the long axis of the ellipse crosses it at a right angle, and check that both sides sit the same distance from the line.
Should the bottom of a cup be drawn as a straight line?
No. The base is a circle seen at an angle, just like the rim, so its visible front edge is a curve. Because it sits a little farther below your eye, that curve should be slightly rounder than the front of the rim.
How do you draw a smooth ellipse freehand?
Move your whole hand from the wrist and elbow in an oval path above the paper a few times, then lower the pencil and draw the shape lightly in one or two loops. Keep the ends rounded, and correct by eye before darkening the line.