How to Draw a Cupcake: A Cute and Easy Step-by-Step Sketch
A cheerful cupcake in five steps: a pleated paper case, three tiers of frosting, a berry on top, then sprinkles and soft shading. Includes an optional friendly face and easy variations.

This drawing at a glance
What you need
- HB pencil
- 2B pencil
- Soft eraser
- Plain paper
A cupcake is one of the friendliest subjects a beginner can pick. It is made of two simple parts, a paper case and a swirl of frosting, and small wobbles in your lines only make it look more hand-made.
This guide shows how to draw a cupcake in five steps, from the first light shape to sprinkles and soft shading. The finished sketch is a good size for a birthday card, a recipe note or a corner of a journal page.
What You Need
- An HB pencil for the light sketch
- A 2B pencil for final lines and shading
- A soft eraser
- Plain paper
Plan for a drawing about 3 in (7.5 cm) tall. That is large enough for the pleats and sprinkles, and small enough to finish in one short sitting.
The Shapes Behind a Cupcake
Before you start, it helps to see what you are building. The paper case is a cut-off cone: a cone with its point sliced away and turned upside down, so it is wider at the top than at the bottom. Its top and bottom edges are curves, not straight lines, because you are looking slightly down at a round object.
How to Draw the Cupcake in Five Steps
Draw the first three steps lightly with the HB pencil. These are your construction lines, and some of them will be erased.
- Draw the paper case. Sketch a shallow curve that sags in the middle, like a relaxed smile, about 2 in (5 cm) wide. This is the top rim. From each end, draw a straight line slanting inward and down. Join the two bottom ends with a second sagging curve, parallel to the first and about two-thirds as wide.
- Stack three frosting tiers. Sitting on the rim, draw a wide, puffy band that overhangs the case a little on both sides, with rounded ends. Above it, add a second rounded band about three-quarters as wide. Above that, add a third, smaller again, and finish it with a soft peak that curls slightly to one side. Tilt each band a little so the frosting seems to spiral.
- Add the pleats. Draw vertical lines down the case from rim to base. Keep the center line straight up and down, and lean the others a little more as they approach the sides, so they fan out toward the top. Each line starts on the top curve and ends on the bottom curve.
- Place the berry. Draw a small circle resting on the peak, about one-quarter the width of the top tier. Add a short curved stem. Erase the part of the peak that sits behind the berry.
- Add sprinkles and shading. Scatter short dashes over the frosting, pointing in different directions. Switch to the 2B pencil, go over the outline, and add a soft band of tone under each tier and a small cast shadow on the ground.
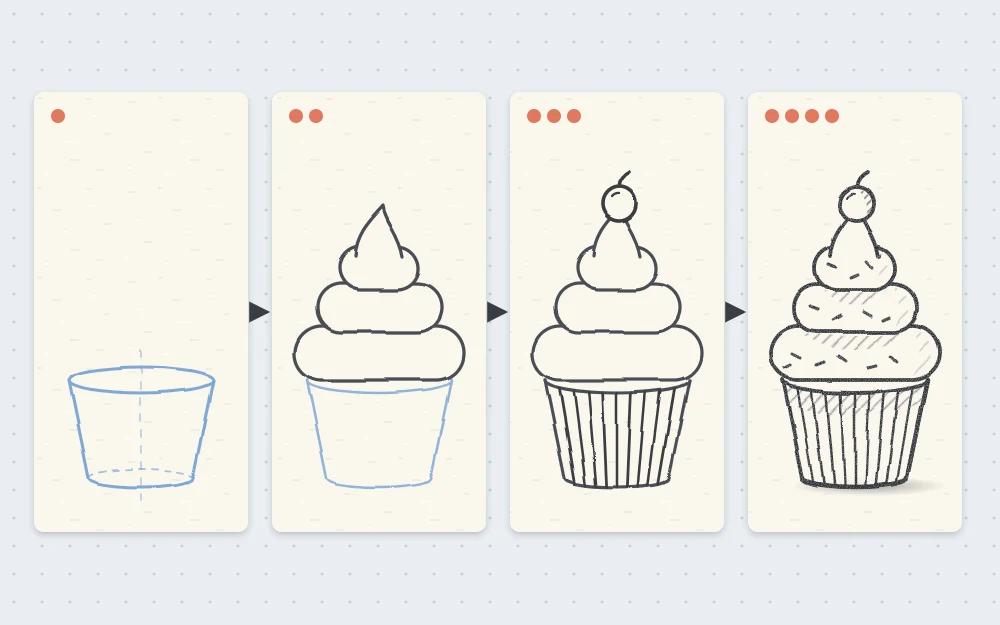
Here is the proportion check: the frosting, without the berry, should be about as tall as the paper case, and its widest tier a little wider than the rim. Frosting that is narrower than the case makes the cupcake look deflated.
Get the Pleats Right
The pleats are what make the case look like folded paper, and they follow two simple rules.
- They fan out. Because the case is wider at the top, the lines spread apart as they rise. Parallel lines would flatten the shape.
- They follow the curve. Space them a little closer together near the left and right sides than in the middle. That bunching suggests the case turning away from you.
Seven to nine lines are enough.
Tip
Draw the center pleat first, then the two outermost ones, then fill in the spaces between. The spacing comes out far more even than working from one side to the other.
Shade Under Each Tier
Frosting looks soft because each tier casts a little shadow on the one below. With the 2B pencil, lay a narrow band of gray along the underside of each tier, darkest right in the crease and fading out as it moves down. Leave the top of every tier as clean paper for a highlight.
On the case, darken one side of each pleat line very lightly, all on the same side. Add a small crescent of tone on the lower side of the berry and leave a tiny white dot near its top. The same idea of a highlight and a shadow side appears in the guide to drawing simple fruit, which is useful if you want a more convincing berry or cherry.
Finish with the cast shadow: a short, flat oval of tone under the base, slightly longer on the side away from your light.
Add a Friendly Face
For a card or a planner, a face turns the sketch into a small character of your own. Place two solid dots on the paper case, a little below its middle and well apart, and add a short curved smile between them. Leave out the pleat lines where the face sits, or keep them very faint.
The same recipe of rounded shapes, low dot eyes and few details works on almost any object. You will find twenty more subjects in the list of simple doodles with friendly faces.
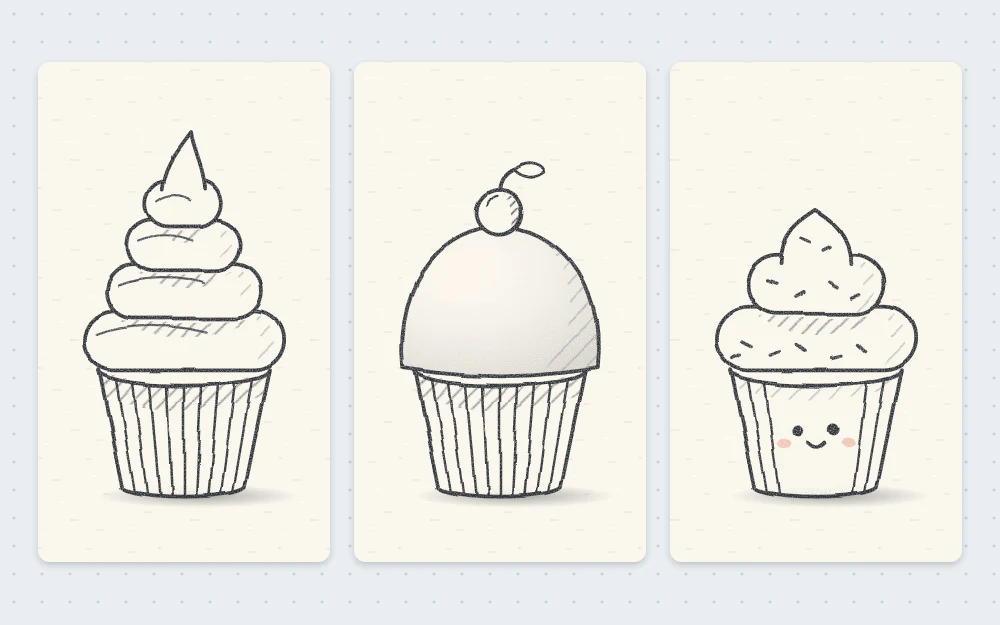
Change the Topping and the Frosting
Once the basic cupcake works, small changes give you a whole tray.
- Smooth dome. Replace the three tiers with one rounded dome, like the top of a mushroom, sitting on the rim.
- Tall swirl. Add a fourth and fifth tier, each smaller, for a high spiral.
- Different toppings. Try a chocolate square, a small star, a candle, or leave the peak bare.
For a simple scene, draw a cup beside it. The coffee cup tutorial uses the same curved rim you practiced on the paper case.
Quick Fixes
- The case looks like a bucket. The sides slant too steeply. Make the base about two-thirds the width of the rim, no narrower.
- The frosting looks like a stack of plates. The tiers are too flat and even. Make each one puffier, tilt them slightly, and let the ends curl.
- The cupcake leans. Draw a faint vertical guideline through the center of the case and line up the peak on it.
Frequently asked questions
How do you draw cupcake frosting that looks swirled?
Stack three rounded bands on the paper case, each one narrower than the band below, and tilt them slightly in alternating directions. End the top band in a small curled peak. A thin strip of shading under each band then separates them and suggests a soft spiral.
Can a cupcake drawing be colored afterward?
Yes. Keep the pencil shading light, then add colored pencil over it. Pale colors suit the frosting, and a slightly darker tone of the same color works well in the creases under each tier. Leave the highlights as bare paper so the frosting still looks glossy.
Why does my cupcake case look flat?
The top and bottom edges are probably straight, or the pleat lines are parallel. Curve both edges so they sag in the middle, and let the pleats spread apart toward the rim. Those two changes make the case read as a round paper cup.